| |
 |
|
|
|
 |
|
 |
| |
| Boat Fishing & Boating A new forum at Striped-Bass.com for those fishing from boats and for boating in general |
 |
 04-27-2011, 06:54 PM
|
#1
|
|
"Fishbucket"
Join Date: Feb 2004
Location: Bahston Hahbah
Posts: 6,588
|
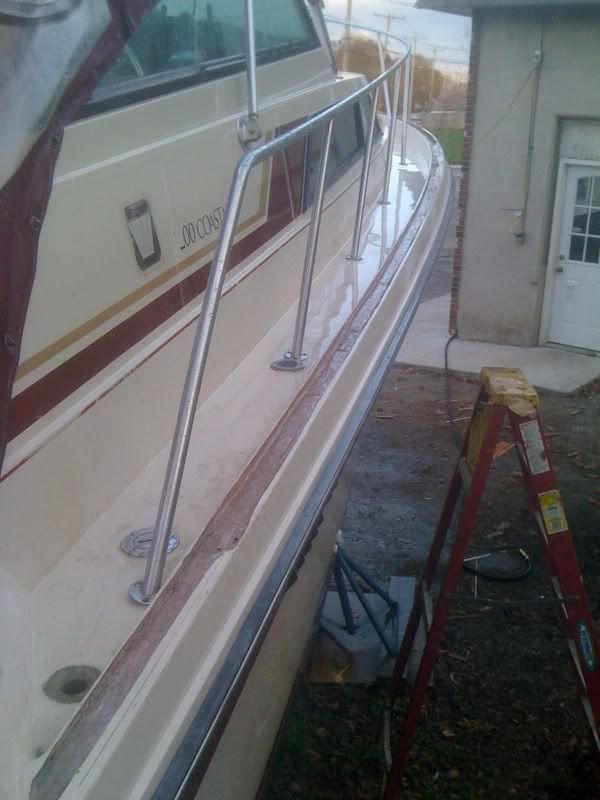
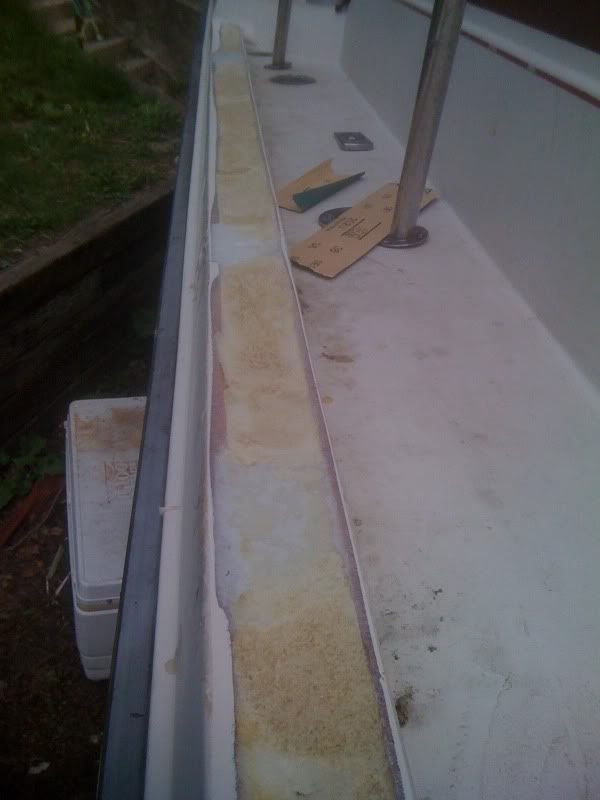
Ideas
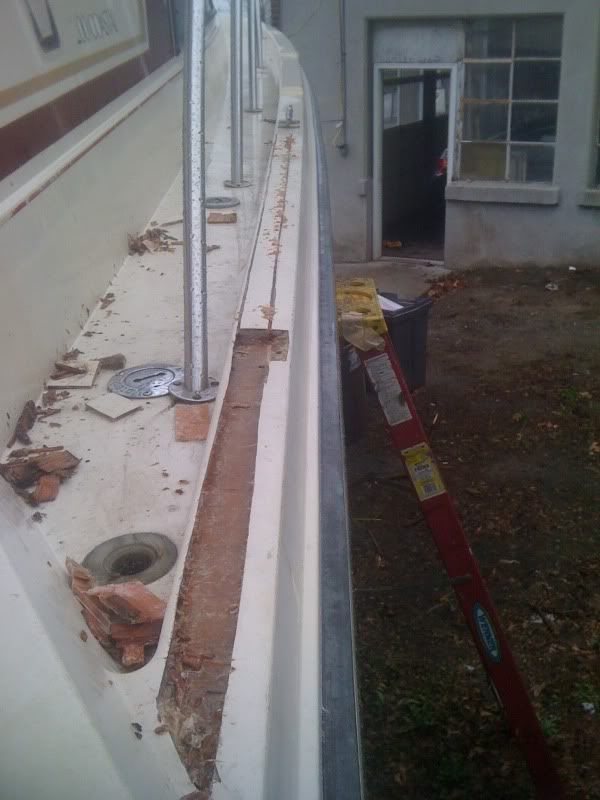
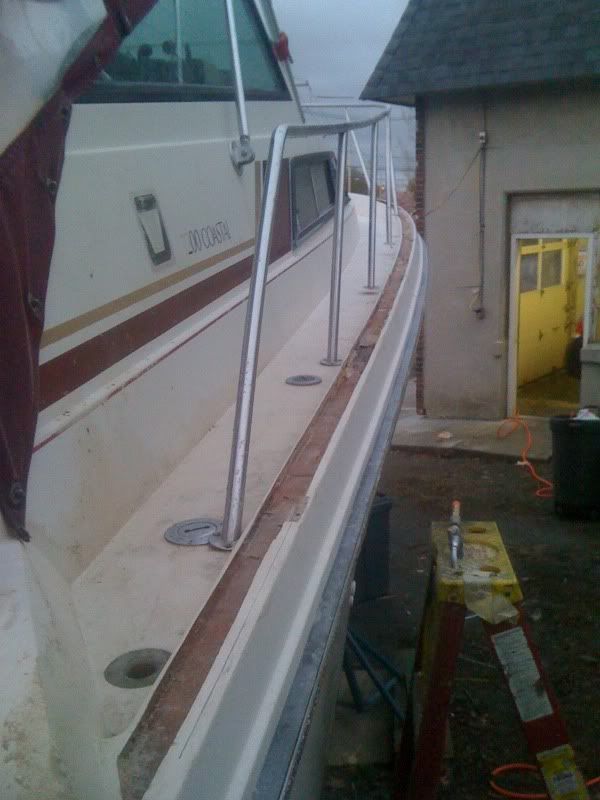
the bowrail mounts are rotted.
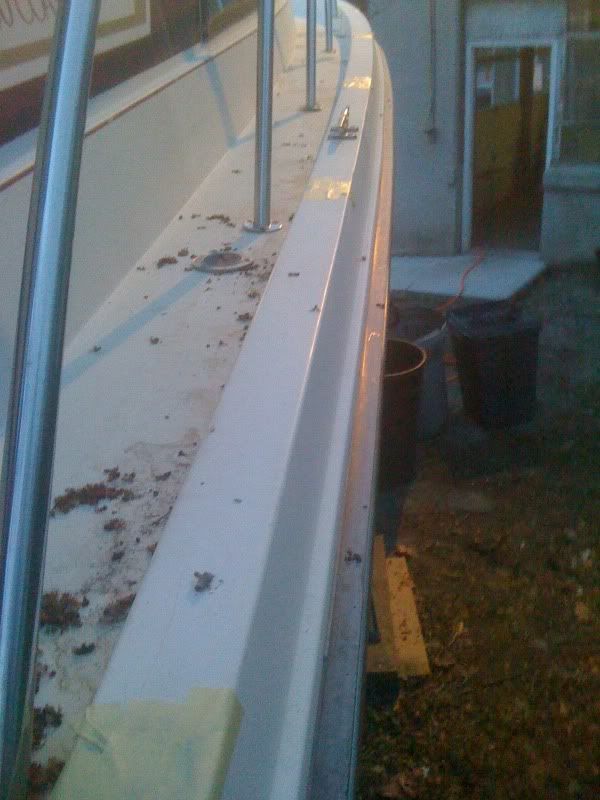
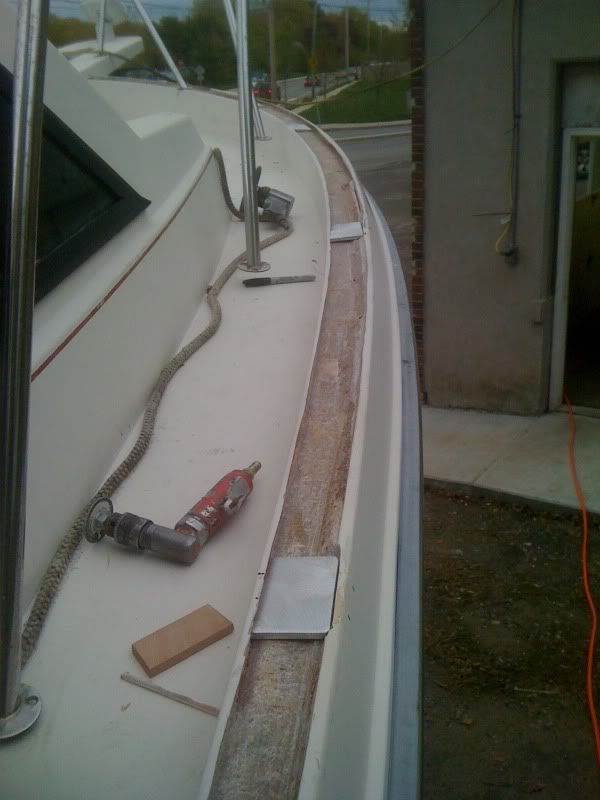
so I have to continue to cut this 1.5" ditch all the way up to the bow and remove all the rotted plywood.
Can't reach to put backing plates or even washers where the bow rail has rotted out.
my idea was to First cut a ditch and remove all the rotted wood. Epoxy oak in it's place and glass over. Re-drill and attach the bow rail.
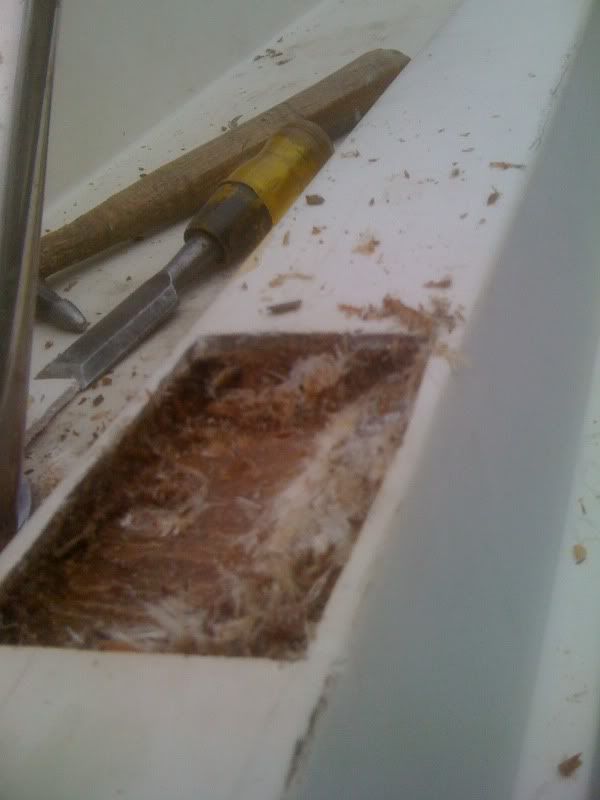
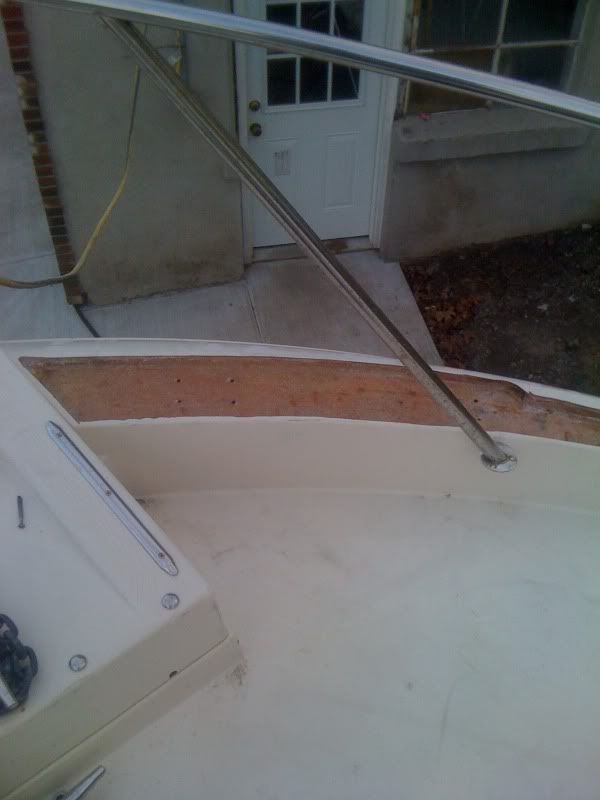
Was thinking if I put an access hole here
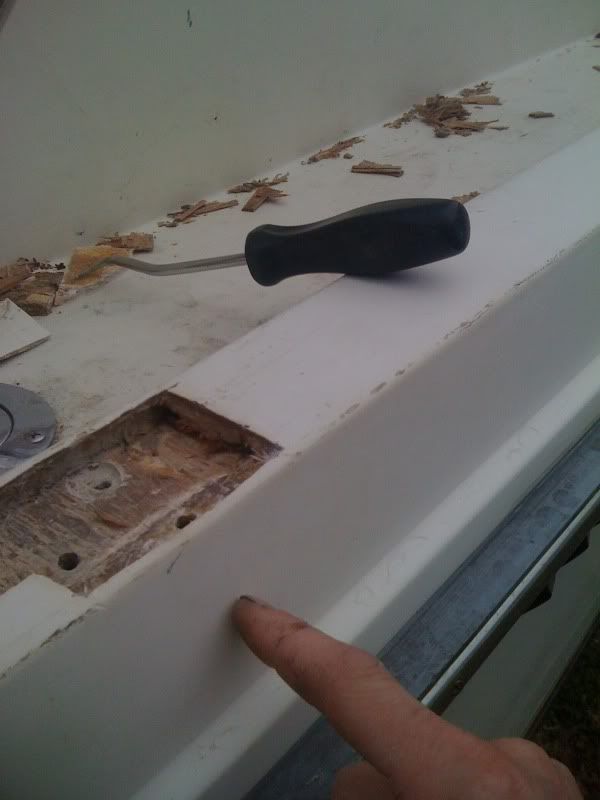
I could reach inside afterwards with needle nose etc. and install washers, lock washers and nuts. Then glass over those holes and be done. Continue that process for each mount.
There is dead space where the thru bolts are now and can't be reached.

What are some other ideas? Aluminum plates epoxied in place then drilled and tapped afterwards? |
|

|

|
|
04-27-2011, 07:10 PM
|
#2
|
|
Seldom Seen
Join Date: May 2001
Posts: 10,557
|
Option one.... How big a hole saw would you have to use to get the plate and nuts in? Try one first. You can use the hole saw to cut plugs you will use in the repair. And maybe try making a template to use with a plunge router to cut out the deck instead of the chainsaw... Then you would have the template to cut out plywood fillers
|
Americans have the right and advantage of being armed, unlike the people of other countries, whose leaders are afraid to trust them with arms. James Madison.
|
|
|
|
|
04-27-2011, 07:20 PM
|
#3
|
|
"Fishbucket"
Join Date: Feb 2004
Location: Bahston Hahbah
Posts: 6,588
|
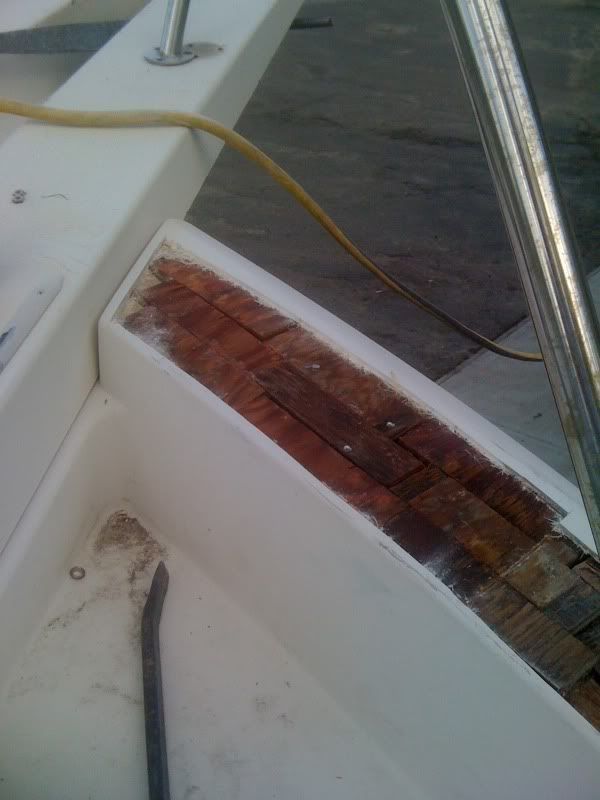
Maybe 3" hole saw that's a good idea.
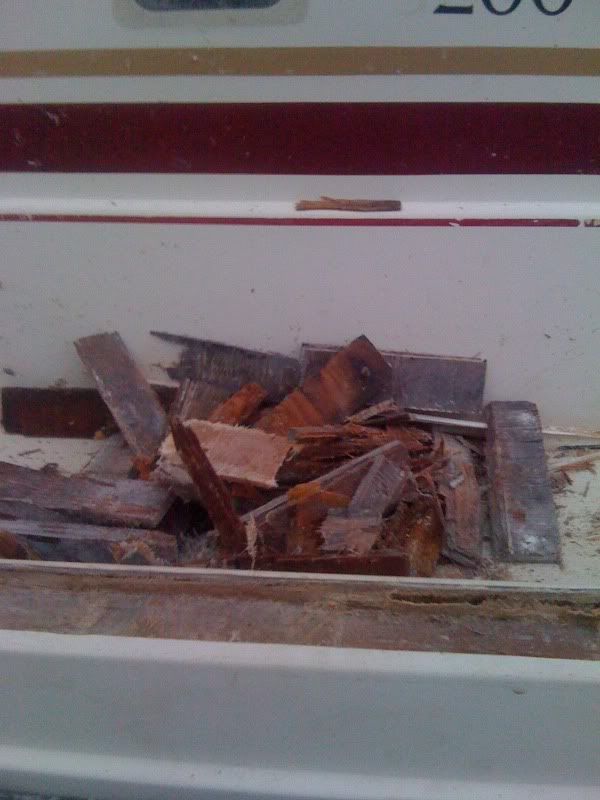
They built this upsidedown with 6"x1.5" plywood scraps just thrown in there and glassed over.
Posted from my iPhone/Mobile device
|
|
|
|
|
|
|
04-27-2011, 07:22 PM
|
#4
|
|
lobster = striper bait
Join Date: Jul 2002
Location: Popes Island Performing Arts Center
Posts: 5,871
|
You really can't get in there?
Not even removing any liner inside the boat?
|
Ski Quicks Hole
|
|
|
|
|
04-27-2011, 07:26 PM
|
#5
|
|
"Fishbucket"
Join Date: Feb 2004
Location: Bahston Hahbah
Posts: 6,588
|
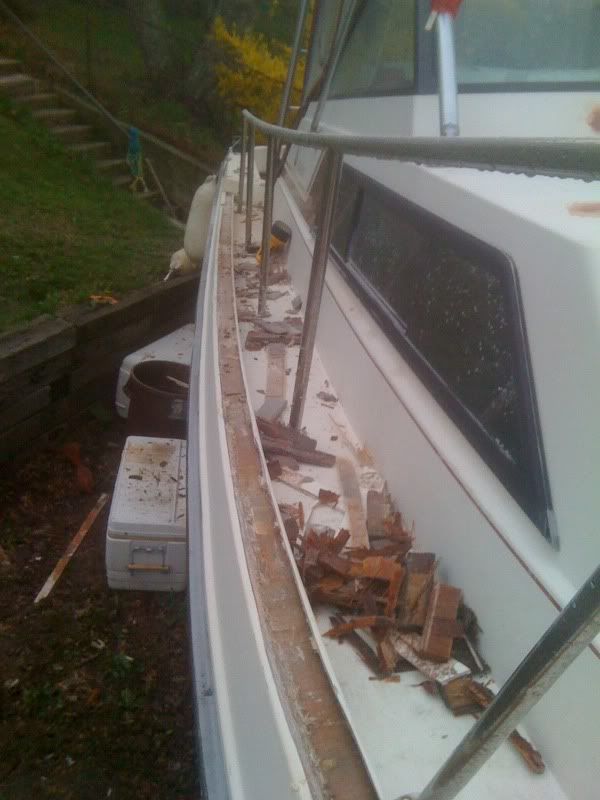
Nope really can't. Only two can be reached up bye the bow with the interior trim removed. There's no liner there. It's capped. If I drill strait down I will be outside the hull if I drill deep enough past the rub rail.
The rear mounts I figured should be the strongest. Maybe the mid mounts I could coarse thread screw them into the new glass and oak?
Posted from my iPhone/Mobile device
|
|
|
|
|
|
|
04-27-2011, 07:40 PM
|
#6
|
|
Seldom Seen
Join Date: May 2001
Posts: 10,557
|
No need to trench entire length, IMO. May be a holesaw from top down where stanchion mounts to deck, bigger than mounting plate. Backing plate (aluminum) larger than that opening. 3" hole saw for access at each stanchion. Holesaws will make it easier to cut plywood for fillers. Finish will be cleaner too.
|
Americans have the right and advantage of being armed, unlike the people of other countries, whose leaders are afraid to trust them with arms. James Madison.
|
|
|
|
|
04-27-2011, 07:51 PM
|
#7
|
|
Registered User
Join Date: Nov 2004
Location: 14000 / 44031.5
Posts: 932
|
Say screw it, and go for the palm beach/carolina no handrail look.
|
|
|
|
|
|
|
04-27-2011, 09:07 PM
|
#8
|
|
........
Join Date: Apr 2002
Posts: 22,805
|
 inlay (if it was me in those circumstances)
another idea.......
scribe it and inlay oak
then temporary set up the railing for hole placements
pre - drill slightly smaller holes and then screw "tap them"
create threads .........yes in wood
install those 1/2 screw / half bolt studs
and then glue turn them in
use cap style nuts on the threaded end
to hold the railing on
|
|
|
|
|
|
|
04-27-2011, 09:22 PM
|
#10
|
|
Seldom Seen
Join Date: May 2001
Posts: 10,557
|
You want to risk your arse on screws with your full weight on it in 8 foot seas??? Bolts with backing plates for a reason.....
Bill, those things deflect under side load. They're OK for cabinets or take apart projects.
|
Americans have the right and advantage of being armed, unlike the people of other countries, whose leaders are afraid to trust them with arms. James Madison.
|
|
|
|
|
04-27-2011, 09:28 PM
|
#11
|
|
"Fishbucket"
Join Date: Feb 2004
Location: Bahston Hahbah
Posts: 6,588
|
I think what I'll do is cut all the rotted wood out, then make up the oak to fit in it's place.
Where the feet bolt thru I will use Say a 6" x 1/4" aluminum plate, then oak, then glass over and finish coat.
Once done I will pencil scribe the holes and then drill & tap to appropriate size machine screws.
For the very rear mount I will cut an access hole in the side and squeeze a backing plate/lock nuts and thru-bolt it.
Reason bieng the rear mount takes the most abuse. That's where everyone grabs and pulls/pushes while docking and grabs onto while going up the bow.
The other mounts will be a heck of alot stronger then they are now.
Posted from my iPhone/Mobile device
Last edited by thefishingfreak; 04-27-2011 at 09:34 PM..
|
|
|
|
|
|
|
04-28-2011, 06:31 AM
|
#12
|
|
Registered User
Join Date: Oct 2003
Location: Marblehead, MA
Posts: 865
|
|
|
|
|
|
|
|
04-28-2011, 07:35 AM
|
#13
|
|
Registered User
Join Date: Jan 2007
Location: Reading Mass/Newburyport/merrimack river
Posts: 3,749
|
Oak and water do not play well together, and splits eaisily if it gets wet.... ... white oak is better than red.. Mahogany ( decking scraps) stands up better is almost as strong...
|
A good run is better than a bad stand!
|
|
|
|
|
04-28-2011, 08:18 AM
|
#14
|
|
Registered User
Join Date: Mar 2004
Location: Marshfield, MA
Posts: 1,753
|
Well,
You have already cut up the deck pretty good with the chainsaw...Nightfighter said it first...... I would have started by buying some GIT-ROT and drill a bunch of 1/4" holes in the top of the deck. This thin epoxy is water thin and soaks into rotton wood and really is the balls. It is made just for this kind of situation. Kind of late for that.
How old is the boat? I wouldn't hesitate to put plywood back in, some Okeomo good stuff. I think any wood put into that situation (encapsulated) over time will rot since all the wholes are in it for the stanchions. Glue it in fill it glass it etc.
If going with oak, don't use red, go white. Some of the best wood boats are framed and planked in white oak, not always easy to find.
Not sure the best easiest way for the fasteners since you have no access. Your plate idea is interesting. Many railings like this are not thru bolted but just screwed and yes over time they get loose so bolting would be best for the long haul.
|
Jon, 24' Nauset-Green Topsides, Beamie, North River. Channel 68/69. MSBA, NIBA
|
|
|
|
|
04-28-2011, 07:40 PM
|
#15
|
|
"Fishbucket"
Join Date: Feb 2004
Location: Bahston Hahbah
Posts: 6,588
|
The boat is a 1984
Not set on oak, figured it would hold a thru bolt better where plywood has a tendency to squish.
I have a bunch of okume plywood I could go with that. I looked into git-rot but it's very wet.
When I bought this boat it was sitting with a very loose railing for two years out in the open. Plus however long it was loose before that. Throw in the season I fished it last year and ignoring it. It just about fell off.
 Posted from my iPhone/Mobile device
Last edited by thefishingfreak; 04-28-2011 at 07:45 PM..
|
|
|
|
|
|
|
04-29-2011, 06:26 AM
|
#16
|
|
Registered User
Join Date: Sep 2001
Posts: 7,649
|
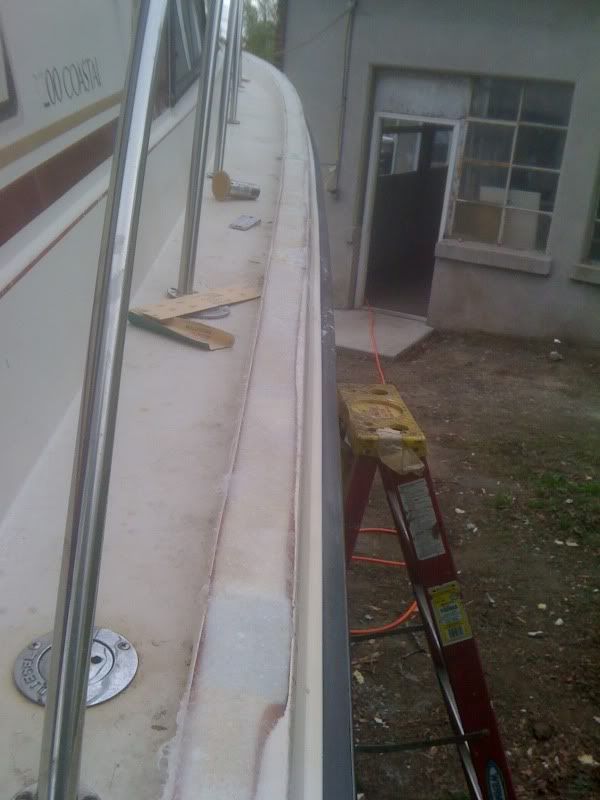
If you are going to be walking up that narrow gunnel offshore...you need a railing or at least a set of solid handrails. The "naked" look may look clean but you can not walk up the side of a boat like that when underway offshore without something. I would consider embedding plates of G10 that are epoxied in that slot. This way you could bolt or screw into something really solid and you could make the plates as large as you need to make sure you have plenty of surface area to insure it is secure.
That looks like a nasty job and you are doing the right things. I am surprised you can't get underneath that from the inside but whatever you do make it as solid as possible and west-system the hell out of it. Avoid wood... well now that I think about it by the time the wood rots again the boat will be near the end of its life so I suppose you could use wood for ease of installation .
Best of luck with that job!!
Last edited by Mr. Sandman; 04-29-2011 at 06:31 AM..
|
|
|
|
|
|
|
04-29-2011, 05:52 PM
|
#17
|
|
Southsider
Join Date: Jul 2002
Location: Bass River, Mass.
Posts: 1,226
|
Quote:
Originally Posted by big jay

Say screw it, and go for the palm beach/carolina no handrail look.
|
Jay you took the words off my keyboard, I'm not a fan of bowrails. |
|
|
|
|
|
|
04-29-2011, 06:30 PM
|
#18
|
|
"Fishbucket"
Join Date: Feb 2004
Location: Bahston Hahbah
Posts: 6,588
|
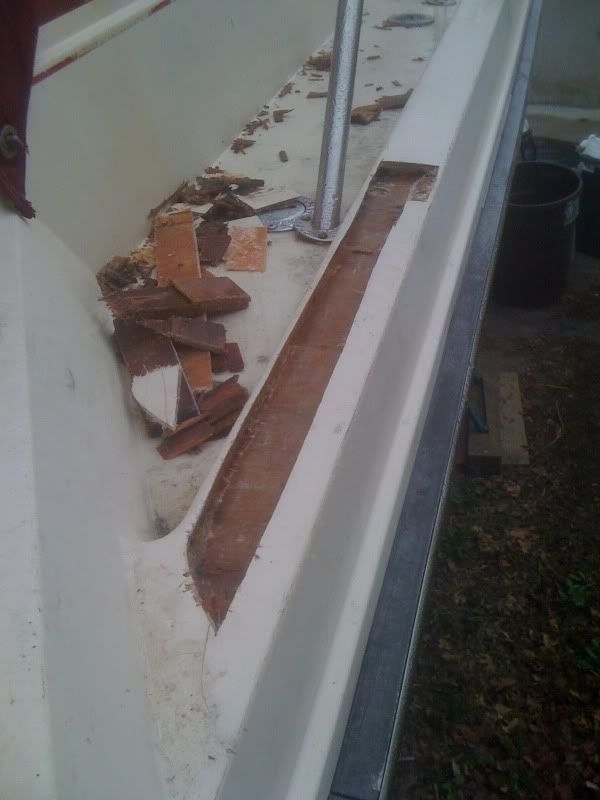
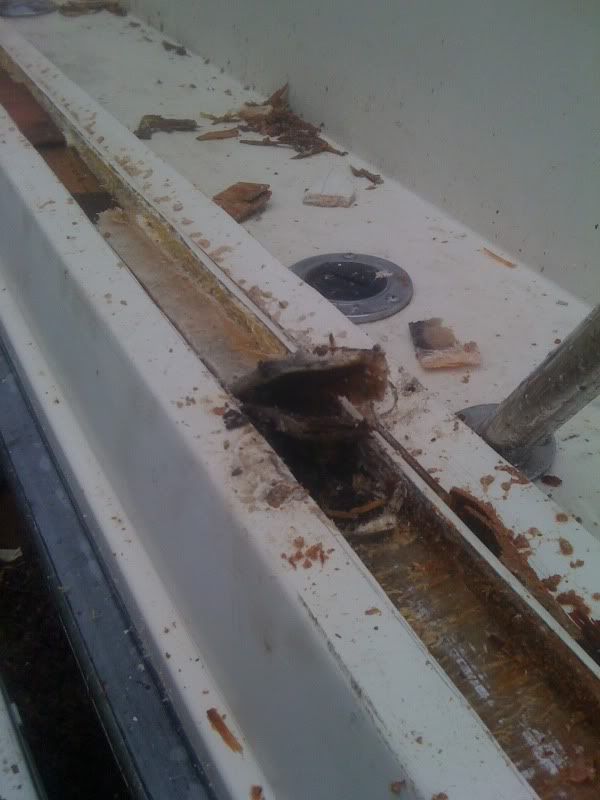
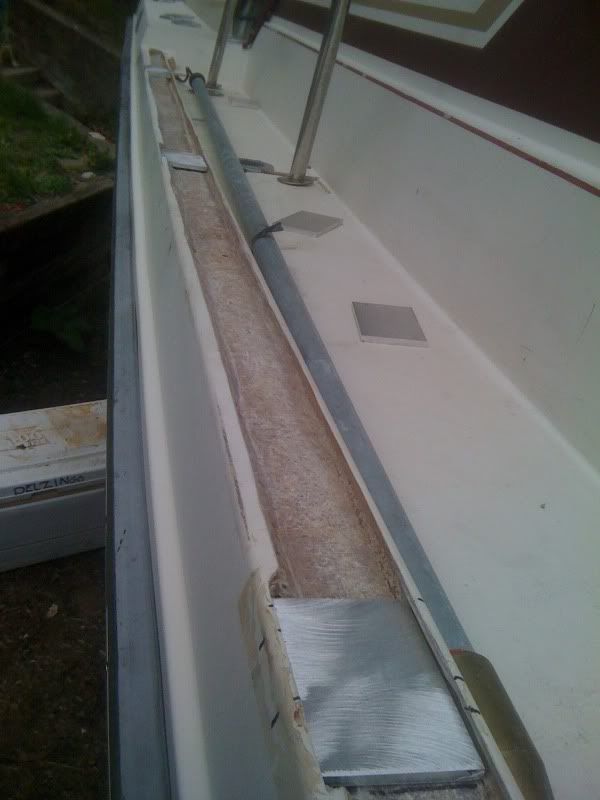
You can see the voids in here just paths for water to flow.
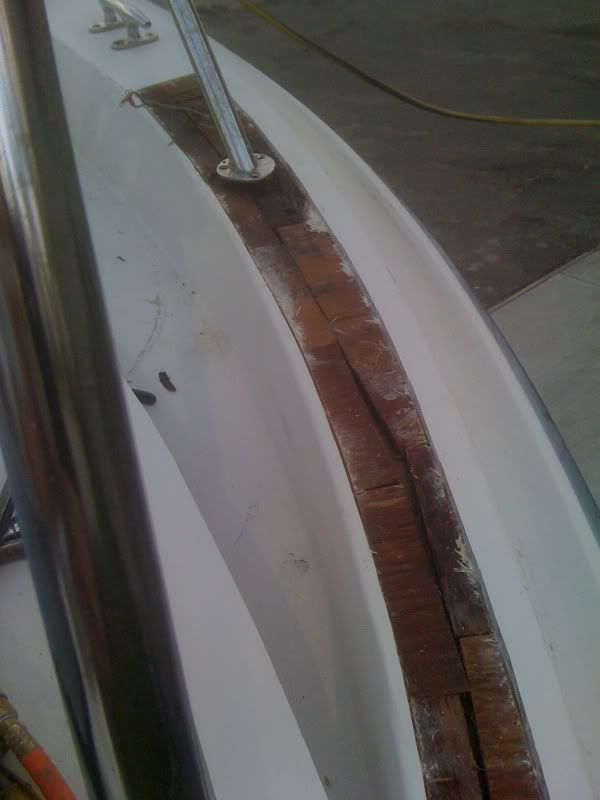
the black wood is allready rotted the red wood is soaked!
all cleaned up and ready for next step
was thinking why not just fill It with glass matt and epoxy? How about starboard in there or something similar I'm not going to be relying on the wood or whatever else that's in there for anything more than a filler. The wood obviously isn't structural
Posted from my iPhone/Mobile device
Last edited by thefishingfreak; 04-29-2011 at 09:21 PM..
|
|
|
|
|
|
|
04-29-2011, 08:29 PM
|
#19
|
|
Registered User
Join Date: Mar 2004
Location: Marshfield, MA
Posts: 1,753
|
Freak,
Have always been impressed at the speed that you work, opened up and cleaned off and ready for step 2.
The plywood or whatever a boat company uses as a filler in situations like this, if they use allot of glass under and over, is really used just as a form when they are laying up the deck. The form creates a fiberglass box which when hard makes a stiff structural member. So even though no one likes the fact that the wood is soaked and rotting this is not always a hugh concern. The obvious problem is that they don't think or no at the time, unless they are really ahead of the game, where all the fittings and stanchions are going. Those places best left solid glass or another material that won't compress and soak water.
You could use foam as a form between stanchions and make the stanchion areas solid glass matt.
On lighter built boats, and yours seems to be pretty heavy in that area, that filler is more stuctural stiffness.
|
Jon, 24' Nauset-Green Topsides, Beamie, North River. Channel 68/69. MSBA, NIBA
|
|
|
|
|
04-29-2011, 08:45 PM
|
#20
|
|
Registered User
Join Date: Jul 2009
Location: Branford, CT
Posts: 156
|
ideas
I think you should stay away from the wood and go with some type of composite core for a filler. I would also put in the plates as you described earlier under that core.Then I would drill a hole in the side and thru bolt the rail on as you originally thought. The hole only has to be big enough to fit a box wrench. Duct tape on the bottom of the wrench, stick the nut in the wrench and put it together. Glass over the holes and finish it up. It will out last your time with it.
Vic
Last edited by Notfishinenuf; 04-29-2011 at 08:48 PM..
Reason: spelling
|
|
|
|
|
|
|
05-15-2011, 06:19 PM
|
#21
|
|
"Fishbucket"
Join Date: Feb 2004
Location: Bahston Hahbah
Posts: 6,588
|
Here's the progress
made aluminum plates here. 3/8" on the rear and 1/4" on the rest.
epoxied and filled the plates in.
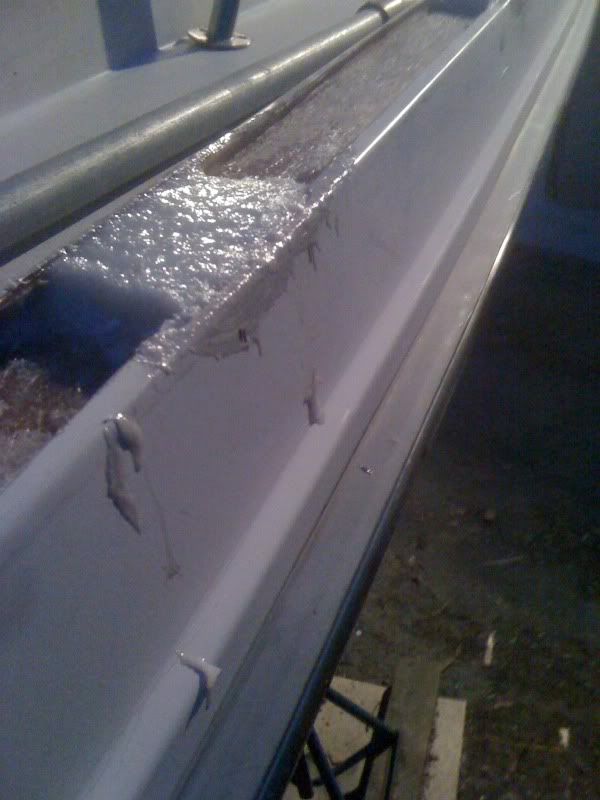
covered with sticky back plastic and filled with foam.

so I have solid glass with a plate of aluminum imbedded, I will drill and tap the screw holes for machine screws later. No wood I used foam to fill the void. I did put a piece of okoume plywood where the bow cleat is. I can get to that thru the anchor locker for backing plates.
2 layers of chopped glass and should be ready for the final sand
 Posted from my iPhone/Mobile device
 |
|
|
|
|
|
|
05-15-2011, 06:31 PM
|
#22
|
|
........
Join Date: Apr 2002
Posts: 22,805
|
Nicely Done Mike
|
|
|
|
|
|
|
05-15-2011, 06:43 PM
|
#23
|
|
"Fishbucket"
Join Date: Feb 2004
Location: Bahston Hahbah
Posts: 6,588
|
I'll save the other side for next spring.
Nobody goes up on the port side anyways, the livewell is in the way.
Posted from my iPhone/Mobile device
|
|
|
|
|
|
|
05-15-2011, 07:13 PM
|
#24
|
|
Registered User
Join Date: Oct 2009
Posts: 122
|
Maybe embed sex nuts through the plates before epoxy. Then no need for drill and tap.
Posted from my iPhone/Mobile device
|
|
|
|
|
|
|
05-15-2011, 07:14 PM
|
#25
|
|
Registered User
Join Date: Nov 2003
Location: On my boat
Posts: 9,703
|
You're so handy  |
LETS GO BRANDON
|
|
|
|
|
05-15-2011, 07:23 PM
|
#26
|
|
Registered User
Join Date: Jun 2002
Location: Weymouth, MA Fore River
Posts: 1,258
|
My arms are itchy now after looking at those pics  |
|
|
|
|
|
|
05-15-2011, 08:32 PM
|
#27
|
|
time to go
Join Date: Oct 2007
Posts: 2,318
|
Cut access holes to install the bolts through the side (like in the photo you are pointing at), then just fiberglass the access hole after installing the railing. You can keep all the work above the rub rail which is area you will be painting anyway, right? (so make the holes big enough to make it easier to install the nuts). Just pre paint where the mounts sit before install the railing, once you insure you get all the nuts on, finish the glass work tape the mounts to protect from paint scuff and apply the final coat, don't forget to tape the rub rail and scuff the whole area where the paint will go to make sure you get good adhesion. I would also look into the proper cleaner to prep the area before painting to eliminate flaws with the paint like fish eye's, once cleaned/prepped do not touch where the paint will be going and if you have, wash that area again. It's been a while but when I used to prep for paint I used a fast evaporating reducer (3812 at the time) and wiped with one hand to put it on and had a dry rag in the other to wipe it off (Caution watch out for solvent soaked rags they can spontaneously combust if left in a pile, put them in an open metal container and place it where it won't cause damage if it does catch on fire).
|
|
|
|
|
|
|
05-16-2011, 05:56 AM
|
#28
|
|
Registered User
Join Date: Sep 2001
Posts: 7,649
|
Good JOB! I think it looks very solid. That should out last the life of the boat. Your bow rail is probably stronger than your cleat now!
Just take care when you drill and tap so you get a straight hole. You can work on my boat anytime.  I have several projects in mind that require that kind of destruction/rip out. I want to put in a second door in the pilot house and put in a transom door. Both will require substantial beefing up to maintain integrity. |
|
|
|
|
|
|
| Thread Tools |
|
|
| Display Modes |
 Linear Mode Linear Mode
|
 Posting Rules
|
You may not post new threads
You may not post replies
You may not post attachments
You may not edit your posts
HTML code is Off
|
|
|
All times are GMT -5. The time now is 02:46 AM.
|
| |


