| |
 |
|
|
|
 |
|
 |
| |
| How To and Favorite Plug Forum Guides This location is for Plug Forum How-To and Step by Step guides as well as popular informational threads |
 |
 02-23-2011, 09:30 AM
|
#1
|
|
Registered User
Join Date: Jan 2007
Location: Reading Mass/Newburyport/merrimack river
Posts: 3,740
|
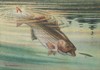
Sand eel swimmer... How to.
I promised Woody at plugfest I would give him the dimensions to my sand eel swimmer, this Pinkney inspired slim bodied bait has been my hottest plug the last two years....
supplies: 1 1/4" X approx 8 1/2" WRC , through wire, a pair of .341 belly grommets, belly lead ( 4 grams) #1 swivels a lefty 1 top slot and a tail grommet.. for hooks, 2/0 VMC fit the bill... my best colors are pearl body, with pink latteral line and gold back, as well as mackerel finish...
I'm going to do this build with out jigs and complicated methods, so some of the newer builders can build it without buying the tool store..
Start by finding center and marking the plug body out... the plug is 7" long and 1 1/16" at the widest point.. using a gouge rough out the square edges, make a cylinder slightly larger than the 1 1/16 target diameter .. the target diameter for the nose is 11/16.. Make a mark at 3 3/8 and 3 3/4.. this area between the two lines will be the widest part of your plug.... the target diameter for the tail is 1/2"... rough out your body leaving enough rom for sanding the final profile..
continued:
|
A good run is better than a bad stand!
|

|

|
|
02-23-2011, 09:43 AM
|
#2
|
|
Registered User
Join Date: Jan 2007
Location: Reading Mass/Newburyport/merrimack river
Posts: 3,740
|
once the body is roughed out, sand smooth contours with #80 sand paper... as of late, I have been using 1" belt sander strips, they last longer and are more durable... finish with #220..
lay out your body, first mark is for your lip slot, this mark will be @ 5/8".. mark #2 @ 1" is your eye mark...Mark #3 is @1 1/2, this is your front hook... Mark # 4 is your belly weight, it is 2 7/8" from the nose, it has been moved forward to allow for a slower retrieve but still have a decent semi fast swim action.. mark 34 is for the rear belly hook it is 4 3/4" from the nose..
Drilling:.. using the square ends to stabilize the plug, line up the center of marks #3 and #5 and spot face the plug with a 1/2" forshner bit ( to flush mount the belly gromet) then follow with 3/8 froshner bit about half way through the plug.. this can also be done with a step drill ( shown in the photo) P/N #29525A51 purchased from McMaster carr... last I knew they were about $35...Now line up hole # 4 and drill a 3/8X3/8 hole, I like a forshner bit for this as well...
My break is over..the conclusion at lunch time..
|
A good run is better than a bad stand!
|
|
|
|
|
02-23-2011, 12:19 PM
|
#3
|
|
Registered User
Join Date: Jan 2007
Location: Reading Mass/Newburyport/merrimack river
Posts: 3,740
|
next step marking the eye... find ( or make) a block of wood the is just above center and draw a pencil line across the circle marked for the eye... use an awl to pilot the hole and use either a hand dril or the drill press with a 1/4 forshner bit to drill the eye socket about 1/16" deep,...
through drilling.. this can be done on the lathe or drill press (if you have enough height) .. I'm useing the lathe ( speed set @1200 rpm) for this fitted with a 5/32 aircraft style bright finish drill bit, drilling from the tail end with the nose supported by the tail stock, hold the plug in your hand and slowly feed the plug into the drill by sliding the tail stock, revers direction often or any time you feel the drill binding or making noises.. you only want to drill to the front hole, if your drill is not long enough, dont worry, the job can be finished by hand when we drill from the front..
Continued..
|
A good run is better than a bad stand!
|
|
|
|
|
02-23-2011, 12:29 PM
|
#4
|
|
Registered User
Join Date: Jan 2007
Location: Reading Mass/Newburyport/merrimack river
Posts: 3,740
|
lip slot... because we are not using jigs or fixtures, in the name of accuracy, I like to use a small square and carry the mark from center across to the mark on the plug for the lip slot... by cutting the slot prior to removing the square ends, it allows for a square and level cut ..
at this point we could move on to cutting off the square ends, but i find when I'm using the square ends that if i put the plug back into the lathe , I can use this to hold my plug for installing the belly weight and for final sanding.. so, install a 4 gram belly weight into the 3/8" hole and fill with some 5 minute epoxy putty, it comes in a stick and all you need to do is pinch off a small piece and mix the twp colors until they are one.. ( I use Elmers 2 part wood repair when I have several plugs) once the putty is dry, you can do your final ( rough) sanding with #220....
|
A good run is better than a bad stand!
|
|
|
|
|
02-23-2011, 12:40 PM
|
#5
|
|
Registered User
Join Date: Jan 2007
Location: Reading Mass/Newburyport/merrimack river
Posts: 3,740
|
remove your plug from the lathe and remove both sqaure ends, I use a band saw, but a back saw works well also...
now slide a #1 lefty high slot into the lip slot, center it and lark it with an awl...remove the lip and using a hand drill. drill at an upward angle into the front hole, you want to be as near the top of the hole ( as if the plug were belly down) as possible, this will keep the #1 swivel from hanging down too low.. if your drill did not reach the front hole, now is the time to connect it... test fit all your parts...if all is fitting properly, lighly sand the plugs ( with the grain) with #320 to remove finger prints and any lingering roughness, lightly round the edges around the nose and tail , this will help paint and top coat to adhere to the plug...dip in your chosen sealer and paint them up..
the finished product should be fitted with 2/0 VMC and either a 3/0 siwash, sparcly tied or flag..
with the sand ell explosion and lack of larger baits in some locals.. slim profile plugs just may be the ticket to a few more hits...
tight lines
Roc
|
A good run is better than a bad stand!
|
|
|
|
|
02-23-2011, 04:07 PM
|
#6
|
|
Super Moderator
Join Date: Aug 2000
Location: Middleboro MA
Posts: 17,119
|
That is a great how to Joe 
I like that plug, I have one  and caught fish on it too.
remind me to add this to the How to forum above  |
|
|
|
|
|
|
02-23-2011, 06:20 PM
|
#7
|
|
Registered User
Join Date: Feb 2011
Posts: 40
|
Rockfish let's all his great secrets out here. I shoulda known...  |
|
|
|
|
|
|
02-23-2011, 09:17 PM
|
#8
|
|
Addicted to plugs
Join Date: Jan 2008
Location: Byfield,MA
Posts: 249
|
I can say first hand that this plug catches,
I was lucky enough to get a mackerel painted sandeel at last years plugfest, was really too beautiful to fish, but I did & it caught a bunch last fall in Rhody.
Thanks again Joe, love your tutorials.
|
|
|
|
|
|
|
02-24-2011, 06:53 AM
|
#9
|
|
Oblivious // Grunt, Grunt Master
Join Date: Nov 2005
Location: over the hill
Posts: 6,682
|
Nice post, Joe. Very interesting to see how you set the plug up.
Just a question, when sanding do you go 80-220-320 or is it a typo and actually 80-120-220? I usually go 80-120-seal-150-prime-220. 320 for unfinished softwood seems pretty fine.
|
|
|
|
|
|
|
02-24-2011, 07:06 AM
|
#10
|
|
Registered User
Join Date: Jan 2007
Location: Reading Mass/Newburyport/merrimack river
Posts: 3,740
|
Quote:
Originally Posted by numbskull

Nice post, Joe. Very interesting to see how you set the plug up.
Just a question, when sanding do you go 80-220-320 or is it a typo and actually 80-120-220? I usually go 80-120-seal-150-prime-220. 320 for unfinished softwood seems pretty fine.
|
I go 80 - 220 .. the 320 is mainly around the edges where i dont want the "rough stuff" to splinter the edge, same goes around the belly holes, lip slot... so the plug gets a quick "once over".. .. after sealing I give it another quick one over with the 320 and again after priming, I hit the plug with 320 before the final paint..my finishes wear like iron.. so I'm happy with the results... |
A good run is better than a bad stand!
|
|
|
|
|
02-24-2011, 07:37 AM
|
#11
|
|
Registered User
Join Date: Sep 2005
Location: Cumberland, RI
Posts: 2,233
|
Great tutorial Joe. Thanks!
|
Good judgement comes from experience, and experience comes from bad judgement -- Keith Benning
|
|
|
|
|
02-24-2011, 04:12 PM
|
#12
|
|
Chris Blouin
Join Date: Mar 2009
Location: Warren, RI
Posts: 3,330
|
Awesome how to man!!
I turned some this winter and looking forward to fishing them hard this season, hoping to maybe replace the faithful redfin with them.
Posted from my iPhone/Mobile device
|
|
|
|
|
|
|
02-25-2011, 02:04 PM
|
#13
|
|
Registered User
Join Date: Feb 2005
Location: Grafton, Ma
Posts: 505
|
Great stuff Joe...thanks for taking the time to put this together.
|
|
|
|
|
|
|
02-25-2011, 02:15 PM
|
#14
|
|
Registered User
Join Date: Oct 2005
Posts: 2,038
|
Thanks Joe !
 |
|
|
|
|
|
|
02-26-2011, 07:30 AM
|
#15
|
|
Registered User
Join Date: Dec 2010
Posts: 134
|
Very impressive, some great work.
I am very interested in the process of developing a plug. For example, I am sure you start out with an idea of what you are trying to develop, like here a sand eel swimmer. And then what?
Do you then come up with the shape and start playing with hook and weight placement? Do you do this by making several with different placements and see which swims the best, or just make one first and see how it swims? Are there some general guidelines you follow, such as weight always goes central and can vary a certain amount or goes under the thickest point?
How about number of hooks, size and placement?
Again, great work and thanks for taking the time to share all the details, I read through this many times....
|
|
|
|
|
|
|
02-26-2011, 06:38 PM
|
#16
|
|
Registered User
Join Date: Feb 2003
Location: Here and There Seasonally
Posts: 5,985
|
We're very fortunate to have such generous plug building masters here..my personal thanks to you all.
|
He that would make his own liberty secure, must guard even his enemy from oppression; for if he violates this duty, he establishes a precedent that will reach to himself.
Thomas Paine
|
|
|
|
|
02-28-2011, 08:05 AM
|
#17
|
|
Registered User
Join Date: Jan 2007
Location: Reading Mass/Newburyport/merrimack river
Posts: 3,740
|
Quote:
Originally Posted by Hookset
Very impressive, some great work.
I am very interested in the process of developing a plug. For example, I am sure you start out with an idea of what you are trying to develop, like here a sand eel swimmer. And then what?
Do you then come up with the shape and start playing with hook and weight placement? Do you do this by making several with different placements and see which swims the best, or just make one first and see how it swims? Are there some general guidelines you follow, such as weight always goes central and can vary a certain amount or goes under the thickest point?
How about number of hooks, size and placement?
Again, great work and thanks for taking the time to share all the details, I read through this many times....
|
For me, it starts with a need... in this instance, the need was for a slim profile swimmer... the idea, like most idea, was not/is not new.. or mine originaly, in this case, Danny Pinkney inspired the idea long before me, I liked the profile ( although I've only seen it on line, never in person) ... so knowing roughly the size of the plug I needed, I spun several bodies out of scrap pine....dipped them in polycrylic to seal them for testing , rigged them using cheap galvinized wire and fitted each with a differant style lip... several holes were drilled in the bellies ( one was tail weighted), in differant location on each plug, each were weighted differantly, each hole ( un ocupied) was filled with modeling clay, which could easily removed to change size and location of weight... after swim testing, i settled on a profile I liked, copied it to a template so I could run them on the duplicator and repeated the process again using WRC.AYC and Birch.... after several trial and errors, i settled on the design i now have, using WRC and the weighting scheme... |
A good run is better than a bad stand!
|
|
|
|
|
03-23-2011, 05:38 AM
|
#18
|
|
Big E
Join Date: Dec 2009
Location: Seabrook, NH
Posts: 681
|
Thank you for this tutorial -- very helpful.
|
|
|
|
|
|
|
04-30-2011, 04:28 PM
|
#19
|
|
Registered User
Join Date: Dec 2010
Posts: 134
|
I swam my sand eels today after making the adjustments you suggested, flag on the back and bend eye down. Man, these have a great swimming action. Thanks for posting the build instructions!
|
|
|
|
|
|
|
 Posting Rules
|
You may not post new threads
You may not post replies
You may not post attachments
You may not edit your posts
HTML code is Off
|
|
|
All times are GMT -5. The time now is 03:17 AM.
|
| |


 Linear Mode
