| |
 |
|
|
|
 |
|
 |
| |
| Plug Building - Got Wood? Got Plug? |
 |
 02-06-2011, 11:53 AM
|
#1
|
|
Registered User
Join Date: Jan 2011
Location: Milwaukee Wisconsin
Posts: 68
|
RTV molds / Resin cast
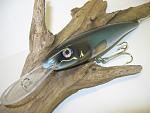
Here is the process I've used to make solid resin copies of original hand carved pieces. I had chosen to do a two piece mold so I could mold in a thru-wire and ballast. I started to write out the process and it got lengthy to say the least, so here is a condensed version with pictures.
The mold box is PVC cut lengthwise. Fill one half with modeling clay and imbed the master half way, be sure to include some type of key ( I used marbles here).NOTE I've seen people use a dowel or something here for a pour passage here, I cut a passage later. Tape mold together, hot glue to base, mix RTV and pour the first half. Wait specified time, ( 14 hours for mine) then take mold apart and remove all the clay. Put the master in the RTV, coat the RTV with a release agent, tape the mold together, hot glue to base, mix and pour the other half of the RTV. See how wordy, and this is condensed. Heres some pics.
Douglas
|
|
|

|

|
|
02-06-2011, 12:00 PM
|
#2
|
|
time to go
Join Date: Oct 2007
Posts: 2,318
|
Nice!
|
|
|
|
|
|
|
02-06-2011, 12:08 PM
|
#3
|
|
Registered User
Join Date: Jan 2011
Location: Milwaukee Wisconsin
Posts: 68
|
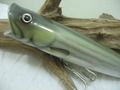
After the mold is set, I drilled a pour hole on the top center and cut the RTV. I made a form for the thru-wire and ballast and set the wire in place in the mold and tape the PVC backed RTV together for a pour. Alumalite Resin with a 50 to 75% mixture of microballoons is what I came up with. Measure equal parts of part A and part B resin in separate cups and add your microballoon mixture equally to both parts. Determine how much you need for your pour and mix equal parts of A and B. Mix quickly and pour right away! There will be some heat generated and some expansion, (will come out the pour hole). You can de-mold after only a couple of minutes, reset and do another pour as the first one hardens completely. It is easy to pour ten copies in an hour.
|
|
|
|
|
|
|
02-06-2011, 12:32 PM
|
#4
|
|
Registered User
Join Date: Jan 2011
Location: Milwaukee Wisconsin
Posts: 68
|
Making jigs as always, aids in the process. I made jigs for the thru-wire, the lip slot cutting, and a holder for the lures with the epoxied lips to stand. Yes, The lip slot could have been molded in, but I wanted to be able to use different lips and lip angles. One version of this minnow style lure I have has a deep diving bill with the line tie on the bill. For that one I'll make a shortened wire that only goes from the belly hook to the tail for the mold. The longer diving bill with the line tie is epoxied in later, and the lip slot is cut at a sharper angle. Heres a pic with some lips epoxied in place, one example of a deep diver and a few others.
Douglas
|
|
|
|
|
|
|
02-06-2011, 12:49 PM
|
#5
|
|
time to go
Join Date: Oct 2007
Posts: 2,318
|
What are you using for these lips?
|
|
|
|
|
|
|
02-06-2011, 12:53 PM
|
#6
|
|
Registered User
Join Date: Jan 2011
Location: Milwaukee Wisconsin
Posts: 68
|
So far I've only done a few lure molds. One is this 7" minnow style , one is this 6 1/2" popper and one jerk/twitch that I've not posted yet. With left over RTV I have made a few eye molds using glass eyes, its nice to have something to pour with leftover resin. The pics show the popper master, a jig for both thru-wires, and the resin.
Douglas
|
|
|
|
|
|
|
02-06-2011, 01:00 PM
|
#7
|
|
Old Guy
Join Date: Oct 2004
Location: Mansfield, MA
Posts: 8,760
|
Quote:
Originally Posted by Rowhunter

Making jigs as always, aids in the process. I made jigs for the thru-wire, the lip slot cutting, and a holder for the lures with the epoxied lips to stand. Yes, The lip slot could have been molded in, but I wanted to be able to use different lips and lip angles. One version of this minnow style lure I have has a deep diving bill with the line tie on the bill. For that one I'll make a shortened wire that only goes from the belly hook to the tail for the mold. The longer diving bill with the line tie is epoxied in later, and the lip slot is cut at a sharper angle. Heres a pic with some lips epoxied in place, one example of a deep diver and a few others.
Douglas
|
can you point to some pointersi on painting those please? |
|
|
|
|
|
|
02-06-2011, 01:09 PM
|
#8
|
|
Registered User
Join Date: Jan 2011
Location: Milwaukee Wisconsin
Posts: 68
|
I made these lips from polycarbonate sheet 5/64". I'll draw up and cut out many different shapes and sizes and test them to get desired results. I'll use a thicker polycarbonate on much larger trolling lures, as well as stainless and G-10 phenolic.
Douglas
|
|
|
|
|
|
|
02-06-2011, 01:21 PM
|
#9
|
|
Registered User
Join Date: Sep 2003
Location: Libtardia
Posts: 21,557
|
nice! this is the exact process that i used to make my surfhog eel long ago.. but after i had rtv molds to make one, i made 20 'plugs' to make another production mold to make 20 at a time..
|
|
|
|
|
|
|
02-06-2011, 01:24 PM
|
#10
|
|
Registered User
Join Date: Sep 2003
Location: Libtardia
Posts: 21,557
|
rowhunter, if you drill 2 holes in your lips at the area that will be inside your plug, why not cast a rtv mold to accept your lip?? the resin will flow around the lip and will flow into the holes, thus locking it in place.
|
|
|
|
|
|
|
02-06-2011, 01:30 PM
|
#11
|
|
time to go
Join Date: Oct 2007
Posts: 2,318
|
So in this photo I assume you install the through wire before casting? Forgive me but I can't fathom how you could add the lip after molding and get the through wire to do what it's doing 
(How do you put the picture in this post? The picture I posted earlier #5 post with the long lip???  ) |
|
|
|
|
|
|
02-06-2011, 01:36 PM
|
#12
|
|
Registered User
Join Date: Sep 2001
Posts: 7,649
|
Did a lot with molding and making hard baits last couple of years. Didn't do much this winter.
Nice paint job.
I like the jig you made to make the wire hanger.
How did the plugs work? Did they catch?
|
|
|
|
|
|
|
02-06-2011, 01:40 PM
|
#13
|
|
time to go
Join Date: Oct 2007
Posts: 2,318
|
This opens up a whole new avenue for me, I can make the shapes I want, even using clay and make a master mold, nice!
|
|
|
|
|
|
|
02-06-2011, 01:43 PM
|
#14
|
|
Registered User
Join Date: Jan 2011
Location: Milwaukee Wisconsin
Posts: 68
|
Remember this is just a quick insight, there are a lot of specifics if you'd like to check this out. With the ratio of resin to microballoon mixture it is possible to achieve density similar to balsa all the way to sinking. So, if you have a plug that you make out of say, Maple or Birch, it would be possible to dial in that mixture, and not have to worry about water intrusion. Painting, not yet! One thing you have to deal with is "off-gassing". The best way to be safe here is to set them aside for about 3 weeks. If you begin priming right away you may have adhesion issues. Also, you most likely have some small pinholes in your casting. If you wish you can fill those with spot filler and lightly sand. I know many of you paint with Creatix or similar, I've been told that Krylon Fusion is a great adhesion promoting primer between the resin and those paints. I use automotive paints so I shoot an adhesion promoter, primer, then start with base coats.
Douglas
|
|
|
|
|
|
|
02-06-2011, 02:31 PM
|
#15
|
|
Registered User
Join Date: Jan 2011
Location: Milwaukee Wisconsin
Posts: 68
|
Nebe, 20 at a time, you were a glutton for punishment, I'd like to see that mold. And yes, thats a great idea of locking the lips in place if I was only doing that one lip type. Thats the nice part of all of this is that there so many different possibilities.
Ec you are seeing it right. The one with the long lip is not a true thru-wire. The lip and wire tie are epoxied in as an assembly. The belly and tail hook attachment are molded in with the ballast. Yes, this is another avenue of possibilities and especially nice for duplicating pieces that have intricate carving.
Painting, I'm planing on starting another thread to throw some things out there.
Douglas
|
|
|
|
|
|
|
02-06-2011, 03:03 PM
|
#16
|
|
Chris Blouin
Join Date: Mar 2009
Location: Warren, RI
Posts: 3,330
|
This is a great post Douglas. Even the unpainted plugs look great. Very cool. The fisherman a few weeks back did a segment on this too.
Another way to make real consistent plugs that will all swim the same.
Thanks.!
Posted from my iPhone/Mobile device
|
|
|
|
|
|
|
02-06-2011, 03:05 PM
|
#17
|
|
Registered User
Join Date: Sep 2003
Location: Libtardia
Posts: 21,557
|
Rowhunter, my eels were soft plastic, so i would simply pour a bunch at a time- once they were demoulded, they were done.. no painting..
are you making your own decals?? im assuming that is how your achieving your colors
|
|
|
|
|
|
|
02-06-2011, 03:32 PM
|
#18
|
|
time to go
Join Date: Oct 2007
Posts: 2,318
|
I for one can't thank you enough for posting the process, it's something I have considered but have yet to do the research.
Thanks!
|
|
|
|
|
|
|
02-06-2011, 04:09 PM
|
#19
|
|
Registered User
Join Date: Jan 2011
Location: Milwaukee Wisconsin
Posts: 68
|
Nebe, soft plastics that makes sense. Decals? No, all of what you see is just airbrushing.
Douglas
|
|
|
|
|
|
|
02-06-2011, 09:01 PM
|
#20
|
|
Registered User
Join Date: Jan 2010
Location: S. Easton
Posts: 1,676
|
Thanks for sharing.....
|
|
|
|
|
|
|
02-06-2011, 09:11 PM
|
#21
|
|
Registered User
Join Date: Sep 2003
Location: Libtardia
Posts: 21,557
|
Quote:
Originally Posted by Rowhunter
Nebe, soft plastics that makes sense. Decals? No, all of what you see is just airbrushing.
Douglas
|
Holy clam and cuttlefish ! That's some amazing airbrushing skills!
Posted from my iPhone/Mobile device |
|
|
|
|
|
|
02-07-2011, 06:42 PM
|
#22
|
|
Registered User
Join Date: Oct 2005
Posts: 2,038
|
Great work Doug! Thanks for sharing.
How strong are the plug bodies compared to say wood or molded plastic, like a Bomber Magnum?
Wondering if this would work for needlefish plugs that bass can get a lot of leverage on at times.
Posted from my iPhone/Mobile device
|
|
|
|
|
|
|
02-07-2011, 06:59 PM
|
#23
|
|
"Fishbucket"
Join Date: Feb 2004
Location: Bahston Hahbah
Posts: 6,588
|
Those are amazing. You are very talented, Mechanically and artistically
Posted from my iPhone/Mobile device
|
|
|
|
|
|
|
02-07-2011, 08:34 PM
|
#24
|
|
Registered User
Join Date: Jan 2011
Location: Milwaukee Wisconsin
Posts: 68
|
Woody, the tensil strength as listed is 6000 psi if that means anything to you. It is a very tough , dense material that machines well. Then we need to add microballoons to get it to float, and this affects the overall strength. The more buoyant the less strength. Now if you have the mixture similar to Maple, it would be strong enough to use screw eyes for hook attachment. If I'm not mistaken I do believe The Greek was working on some needles.
Douglas
|
|
|
|
|
|
|
02-07-2011, 10:46 PM
|
#25
|
|
Super Moderator
Join Date: Aug 2000
Location: Middleboro MA
Posts: 17,119
|
Those are really sweet!
|
|
|
|
|
|
|
02-07-2011, 11:01 PM
|
#26
|
|
Registered User
Join Date: Sep 2003
Location: norwood pa
Posts: 166
|
I picked Dougs brain for a couple months about a year or so ago. He told me pretty much everything I know about this and shortened the learning curve on it for me immensely. I only dabbled with it for a real short time but it was really neat what you could do with the stuff. If I ever get some more time to play with it again I would really like to get into it a bit more. For now I had to put it on the backburner. Cost is high and waste is big when your figuring things out and trying to get into it. Your molds are THE most important part. I did make a bunch of needles. I weighted a few and went with straight resin on a bunch of others. I gave them all away exept for one I have and it was one of the bad pours. I poured mine on a rod that I removed immediately after the bait hardened to get my through hole. Everything was done and ready to prime out of the mold. Thanks Doug for everything and I'm sure I will try this again soon. It's crazy if you think about the possibilities. Your stuff is off the charts. Woody here are the needles I made.

 |
|
|
|
|
|
|
02-08-2011, 12:19 AM
|
#27
|
|
Registered User
Join Date: Jan 2011
Location: Milwaukee Wisconsin
Posts: 68
|
Those look great Ted, I know that they'll hold up well, how was the performance? Were you still working on the mixture?
Douglas
|
|
|
|
|
|
|
02-08-2011, 04:49 PM
|
#28
|
|
Registered User
Join Date: Sep 2003
Location: norwood pa
Posts: 166
|
Douglas I tried making these needles as my first resin baits because I knew I would be able to make a mold fairly easy and be able to vary the weighting easily as well with the way I set the mold up. I was weighting them on the rod I removed for my through hole and could pretty much put a weight anywhere along the blank. I unlike many here only use a needle as a delivery system for a teaser. I only use them in the fall and in a heavy surf at times. I only need them to cast well and stay down. Using just resin and no microballoons they did that. I have never made a wooden needle that caught well. It along with a bunch of other plugs is something I've never had any success building or fishing with.
|
|
|
|
|
|
|
02-08-2011, 07:14 PM
|
#29
|
|
Registered User
Join Date: Oct 2005
Posts: 2,038
|
Neat stuff with lots of potential.
Thanks D and T!
Posted from my iPhone/Mobile device
|
|
|
|
|
|
|
 Posting Rules
|
You may not post new threads
You may not post replies
You may not post attachments
You may not edit your posts
HTML code is Off
|
|
|
All times are GMT -5. The time now is 06:03 AM.
|
| |


 Linear Mode
