| |
 |
|
|
|
 |
|
 |
| |
| Plug Building - Got Wood? Got Plug? |
 |
 12-08-2010, 06:18 PM
|
#1
|
|
Oblivious // Grunt, Grunt Master
Join Date: Nov 2005
Location: over the hill
Posts: 6,682
|
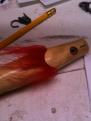
Big Popper How to/ Blue Streak 3 oz
Here is a how-to for a big popper.
This is the large Blue Streak.
weighs 3.1 oz rigged with 4/0's, floats near vertical (about 80 degrees)with the water (fresh) just above the first grommet.
It is 7 3/8" long
1.33" wide at the head, .60"at the tail.
1.06" at the second hook which is 2 9/16" from the TAIL
1.32" at first hook, which is 5 3/4" from the TAIL
It has a 1/2 " slope to the head (a 73 degree cut on your mitre gauge).
The face is cupped asymmetrically (see the second photo)
The cup measures 1.18", but it turns out a 1.25" salty ball cuts it right (more on that to come).
The plug carries a big tail weight. 5/16x 1.5" approximately.
Rumor has it that original Blue streaks were mahogany.....I used pine and it seems pretty close weight wise. If you use mahogany be careful.....mahogany nowadays is not the same as the Honduran mahogany that was widely available when blue streaks were made.
The posts that follow will explain how I built 'em. There are other ways to make poppers and anybody starting out would do well to search under popper mouth or popper face first.
Here we go.
|
|
|

|

|
|
12-08-2010, 06:27 PM
|
#2
|
|
Oblivious // Grunt, Grunt Master
Join Date: Nov 2005
Location: over the hill
Posts: 6,682
|
Obviously, you first turn your body and thru drill on center.
The next step is to cut the face. To do this I use a drill press and a salty ball (rotary rasp). As you cut the face it will generate a lot of downward pressure on the plug and rotary force as well. Holding it in your hand is ill-advised, so I made a jig. Just a board with a vertical V block screwed to it. At the base there is a 1/8" pin that I can set the tail hole on. Take a compass and draw a circle centered on this pin that is the same radius as your plug's at the max diameter ( which is 2x the radius for Back Beach's benefit), then position the walls of your V block against this circle and fasten it down.
Higher up drill a center hole through you V block to put a screw in. This screw will keep the plug from rotating when the rasp bites it. You can't hold it by hand alone.
|
|
|
|
|
|
|
12-08-2010, 06:32 PM
|
#3
|
|
Oblivious // Grunt, Grunt Master
Join Date: Nov 2005
Location: over the hill
Posts: 6,682
|
The next step is not immediately obvious, but you don't want to drill/cut on center. This is because when you cut the slant on the plug, it will cut through a sphere and the lower lip will end up thicker than the top (see the first photo). With the Blue Streak it is even more important because the original has an off center cup (the top is thicker than the lower rim). To accomplish this you want to drill/cut off center and closer to the lower rim (see the second photo). How much takes some experiment, for this plug about 3/16" worked well.
|
|
|
|
|
|
|
12-08-2010, 06:37 PM
|
#4
|
|
Oblivious // Grunt, Grunt Master
Join Date: Nov 2005
Location: over the hill
Posts: 6,682
|
Now you'd think you could cut the whole cup with the rasp, and maybe you can, but that doesn't work for me, so I rough out the hole first using fostner bits. In this case a 1 1/8, 1, and 1/2 ". You can see the idea in the first photo. Then I'll use the rasp to do the rest. Note the brass wire brush. That gets used to clean the rasp several times with each cut....otherwise things stop cutting and start burning.
|
|
|
|
|
|
|
12-08-2010, 06:41 PM
|
#5
|
|
Oblivious // Grunt, Grunt Master
Join Date: Nov 2005
Location: over the hill
Posts: 6,682
|
Next to the table saw to cut the slant. To keep things level I screw the plug to a board, through a hole 1/2 the diameter of the plug from the edge of the board. Then a pass through the saw with the miter gauge at 73 degrees. And then presto the end result.
|
|
|
|
|
|
|
12-08-2010, 06:46 PM
|
#6
|
|
Oblivious // Grunt, Grunt Master
Join Date: Nov 2005
Location: over the hill
Posts: 6,682
|
The rest is pretty standard, but there are a few tips that might interest some.
Next I drill the belly holes using a centered V block.
Look closely at the picture and you'll see two things that help. First I use a smaller V block that I can slide under the tail to level the plug. Second I use a square against the slant of the face to be sure the apex of the slant will end up aligned with the belly hole (if you rotate the plug against the square edge the slant moves away on one side.....when both sides touch you are aligned).
|
|
|
|
|
|
|
12-08-2010, 06:49 PM
|
#7
|
|
Oblivious // Grunt, Grunt Master
Join Date: Nov 2005
Location: over the hill
Posts: 6,682
|
Then I drill the weight hole using a step drill so I stay on center (Paul will undoubtably notice the drill is off line...that is because this body was a misdrill  ). Mark the depth with tape. |
|
|
|
|
|
|
12-08-2010, 07:00 PM
|
#8
|
|
Oblivious // Grunt, Grunt Master
Join Date: Nov 2005
Location: over the hill
Posts: 6,682
|
Then off to a box of unfinished crap to wait until a few days before Plugfest when it is too late to possibly finish them but I'll feel I need to try.
And that concludes my bit of this little How To.
There are other ways to cut popper faces using router bits, reground spade bits, and a really neat idea posted on SOL by a guy who turns a disc the diameter of his cup in the center of a spindle, then glues sandpaper to its edge, leaves it between the centers on his lathe,holds the plug body perpindicular and supported on his tool rest, turns on the lathe, advances the plug face into the disc, and rotates the plug to cut the face. Impressively clever and clear proof that guy is not from Franklin.
Anybody else please feel free to chip in what they do differently.
|
|
|
|
|
|
|
12-08-2010, 07:09 PM
|
#9
|
|
Registered User
Join Date: Dec 2010
Posts: 342
|
Numbskull,
AWESOME post! Thanks,
MS
|
|
|
|
|
|
|
12-08-2010, 08:34 PM
|
#10
|
|
Uncle Remus
Join Date: Mar 2003
Location: Lakeville Ma.
Posts: 14,773
|
nice how too. Didn't notice a thing.
|
"A beach is a place where a man can feel he's the only soul in the world that's real"
|
|
|
|
|
12-08-2010, 09:14 PM
|
#11
|
|
Registered User
Join Date: Jan 2010
Location: S. Easton
Posts: 1,676
|
Thanks for the tip, pre drilling before using the rasp!
|
|
|
|
|
|
|
12-08-2010, 09:27 PM
|
#12
|
|
Registered User
Join Date: Jun 2008
Location: Lexington, MA
Posts: 1,940
|
Sweet tutorial... Plugmaking and Woodworking... its all about using jigs to get consistent results
|
 Blond Terror
|
|
|
|
|
12-08-2010, 10:30 PM
|
#13
|
|
........
Join Date: Apr 2002
Posts: 22,805
|
 George
although i like your three stage method (great tutorial) 
i'm not so sure that the WOOD burning is such a bad thing tho
if you let off pressure as you go....because that makes the wood harder 
at least that was my experience using a ball rasp
because i used to smoke the cup on purpose is my point...
it didn't seem to be detrimental for the plug .....prolly bad for the ball rasp though
because the metal would eventually loose it's temper. |
|
|
|
|
|
|
12-08-2010, 11:50 PM
|
#14
|
|
Chris Blouin
Join Date: Mar 2009
Location: Warren, RI
Posts: 3,330
|
Awesome post, great how to.
Thanks.
Posted from my iPhone/Mobile device
|
|
|
|
|
|
|
12-08-2010, 11:56 PM
|
#15
|
|
Super Moderator
Join Date: Aug 2000
Location: Middleboro MA
Posts: 17,119
|
very impressive George 
I have some spanish cedar that is light enough that it may work good for one of those |
|
|
|
|
|
|
12-09-2010, 05:59 AM
|
#16
|
|
Registered User
Join Date: Jun 2003
Posts: 135
|
Nice post , thanks
|
|
|
|
|
|
|
12-09-2010, 07:18 AM
|
#17
|
|
Registered User
Join Date: Jun 2008
Location: Lexington, MA
Posts: 1,940
|
I'm going to make a few in pine and some in from a chunk of old Honduras mahogany that my dad gave me yrs ago. Spanish cedar should be a great substitute as well.
Cool old school plug.
|
Blond Terror
|
|
|
|
|
12-09-2010, 11:06 AM
|
#18
|
|
Uncle Remus
Join Date: Mar 2003
Location: Lakeville Ma.
Posts: 14,773
|
|
"A beach is a place where a man can feel he's the only soul in the world that's real"
|
|
|
|
|
12-09-2010, 06:13 PM
|
#19
|
|
Registered User
Join Date: Apr 2003
Location: Cranberry Coast Gateway 2 Cape Cod
Posts: 4,143
|
Numbskull thanks , You have opened up and to allowed us who are challenged , to see how it's done , ? is Flap looking over your shoulder
and if he is you got a good guarding ANGLE .
ML Sr.
MERRY CHRISTMAS
|
" Happy as a clam at high tide "
|
|
|
|
|
 Posting Rules
|
You may not post new threads
You may not post replies
You may not post attachments
You may not edit your posts
HTML code is Off
|
|
|
All times are GMT -5. The time now is 03:07 AM.
|
| |


 Linear Mode
