| |
 |
|
|
|
 |
|
 |
| |
| How To and Favorite Plug Forum Guides This location is for Plug Forum How-To and Step by Step guides as well as popular informational threads |
 |
|
 01-20-2013, 08:01 AM
|
#91
|
|
Oblivious // Grunt, Grunt Master
Join Date: Nov 2005
Location: over the hill
Posts: 6,682
|
The end result is a consistent quick curved cut. The plug shown was from a timid early try, but by shimming under the plug while in the sled I can cut much closer to the final line. I then clean up on a belt sander (although you can also pattern sand with a disc sander and that would be the way to go if you have one).
|
|
|

|

|
|
01-20-2013, 08:52 AM
|
#92
|
|
Seldom Seen
Join Date: May 2001
Posts: 10,395
|
Nice, George. I must admit that I have just turned darter bodies and have not yet built anything to help with replicating the slope cut....
This morning I have eyes and belly grommets to epoxy in. Hope to wire this first run in the afternoon, along with turning some more bodies. Still working with the color shift paint, but cannot get the brilliance of the green to show up in the photos. Same plug in all three shots. Constantly changes with the angle and light.
|
|
|
|
|
|
|
01-20-2013, 09:55 AM
|
#93
|
|
Registered User
Join Date: Sep 2003
Location: norwood pa
Posts: 166
|
George your wealth of knowledge and willingness to share it, is a priceless tool we all end up borrowing from you. Thanks for everything you post.
|
|
|
|
|
|
|
01-20-2013, 10:38 AM
|
#94
|
|
Uncle Remus
Join Date: Mar 2003
Location: Lakeville Ma.
Posts: 14,773
|
Willingness my eye. He never showed me that yesterday. I think I did scope it out but he wasn't revealing about it and it was hard to tell inthat mess he calls a basement
Posted from my iPhone/Mobile device
|
|
|
|
|
|
|
01-20-2013, 11:00 AM
|
#95
|
|
Registered User
Join Date: Dec 2010
Posts: 134
|
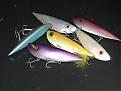
Well, spent some time painting and sealing this weekend while not working on the bathroom. Here are some pics of the Eddie needles, 7" Danny, Small 4 3/4" swimmers, and Small Musso swimmers. I have another 5 with paint drying
|
|
|
|
|
|
|
01-20-2013, 11:01 AM
|
#96
|
|
Registered User
Join Date: Dec 2010
Posts: 134
|
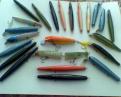
more pics
|
|
|
|
|
|
|
01-20-2013, 11:01 AM
|
#97
|
|
Registered User
Join Date: Dec 2010
Posts: 134
|
and a few more
|
|
|
|
|
|
|
01-21-2013, 02:58 PM
|
#98
|
|
____________
Join Date: Jun 2008
Location: new bedford, Ma.
Posts: 651
|
Quote:
Originally Posted by the greek

The popper is handcarved but unlike anything Ive done before. All the stuff I've handcarved before was just a profile cutout then a topdown view cutout. Kind of easy and nothing over complicated. This one has for lack of a better term, compound curves. They kind of go in two different directions at once. I had to do some of the roughing out with the drum sander. It all came together rather quickly and evenly to my surprise. I'm almost afraid to paint it because something has to go wrong. The power will go out when I put it on the spinner or something. I was afraid that the way the tail hanger was set up that it would turn the plug over but It sits very nice and is pretty stable. It is weighted on the belly hanger. They say that all their lures [Arcadia Reef] are hand made from wood. I have no idea how they do it and keep everything so consistent.
Here's a few that I just finished.


 |
Really love the shape of that bottom plug. Awesome |
Nobody calls me Lebowski. You got the wrong guy. I'm the Dude, man.
|
|
|
|
|
01-21-2013, 03:03 PM
|
#99
|
|
____________
Join Date: Jun 2008
Location: new bedford, Ma.
Posts: 651
|
Quote:
Originally Posted by the greek
George your wealth of knowledge and willingness to share it, is a priceless tool we all end up borrowing from you. Thanks for everything you post.
|
Agreed. I second The Greek as I've burrowed a million of George's techniques/ideas.
I built a similar sled the first time I looked at a photo of it, although I didn't use a guide and I think I put flashing on it which caused sparks.
genius |
Nobody calls me Lebowski. You got the wrong guy. I'm the Dude, man.
|
|
|
|
|
01-21-2013, 08:51 PM
|
#100
|
|
Oblivious // Grunt, Grunt Master
Join Date: Nov 2005
Location: over the hill
Posts: 6,682
|
Quote:
Originally Posted by Hookset
and a few more
|
Nice! |
|
|
|
|
|
|
01-21-2013, 08:55 PM
|
#101
|
|
Oblivious // Grunt, Grunt Master
Join Date: Nov 2005
Location: over the hill
Posts: 6,682
|
Quote:
Originally Posted by eskimo
Agreed. I second The Greek as I've borrowed a million of George's techniques/ideas.
|
Which is good since pretty soon I'll need you guys to show me how to do it all over again.  |
|
|
|
|
|
|
01-21-2013, 10:44 PM
|
#102
|
|
Registered User
Join Date: Feb 2008
Location: RI
Posts: 57
|
Working on some bottles and bottle darters. A little of everything. I will put up pics when done
Posted from my iPhone/Mobile device
|
|
|
|
|
|
|
01-23-2013, 06:34 PM
|
#103
|
|
Seldom Seen
Join Date: May 2001
Posts: 10,395
|
Couple upgrades to the spinner box. Fender washers on plexi doors with magnetic catch. Handles on sides to carry more easily. First round in the box for the year!
|
|
|
|
|
|
|
01-23-2013, 08:53 PM
|
#104
|
|
____________
Join Date: Jun 2008
Location: new bedford, Ma.
Posts: 651
|
great looking spinner. I was having problems with my epoxy so I went back and rebuilt a storage bin spinner as I've had better luck with that then anything I came up with after.
|
Nobody calls me Lebowski. You got the wrong guy. I'm the Dude, man.
|
|
|
|
|
01-25-2013, 07:24 AM
|
#105
|
|
Registered User
Join Date: Dec 2010
Posts: 134
|
That is beautiful, I still spend two hours hand turning, gotta get moving on a spinner project
Posted from my iPhone/Mobile device
|
|
|
|
|
|
|
01-25-2013, 07:59 AM
|
#106
|
|
Seldom Seen
Join Date: May 2001
Posts: 10,395
|
Thanks. But it is far from perfect....
The motor came out of a microwave carousel and is perfect for this. Need to add an in-line on/off switch for carousel. Currently it requires me to plug/unplug from power strip, which can be tricky when you have a wet epoxied plug to load.... The design of the box also limits me to being able to touch up a plug during the front third of its rotation. But it is for drying, not applying....
|
|
|
|
|
|
|
01-26-2013, 09:01 AM
|
#107
|
|
Registered User
Join Date: Dec 2010
Posts: 134
|
I have a motor in the shed from one of those George Forman type rotisserie. Just need to start putting together the plan and get to it.
Posted from my iPhone/Mobile device
|
|
|
|
|
|
|
01-27-2013, 10:37 AM
|
#108
|
|
Seldom Seen
Join Date: May 2001
Posts: 10,395
|
Building a jig to hold a plug while applying epoxy before transferring to spinner. Want to be able to rotate it while applying as well.
Then applying second coat to 20 plugs, since the first coat hasn't hardened enough and is just a little tacky to the touch. Not enough to leave fingerprints, but ..... Got a couple syringes to make a better measurement.
Been off the building as I have been stripping and refinishing a not quite antique pine table that is going to be an office desk for the better half. Was a wax finish that I stripped with mineral spirits and 0000 steel wool. Took a lot of time and gave off a smell like BO...... Two coats of Spar satin on the legs and stretchers. Flip later today to get second of four coat on the top.
|
|
|
|
|
|
|
01-27-2013, 12:12 PM
|
#109
|
|
Registered User
Join Date: Feb 2010
Location: CT
Posts: 448
|
I've been trying to finish up my dupe the last week or so, haven't turned anything new in a while. It's finished for the most part just have to add the handles. Thanks to everyone that helped me out, professor m and mojo7 and I borrowed some ideas from fishbumwannabe. The whole project cost me $5 and a few plugs.
|
|
|
|
|
|
|
01-27-2013, 12:21 PM
|
#110
|
|
Registered User
Join Date: Feb 2010
Location: CT
Posts: 448
|
One last picture, I made it so you can adjust the follower without removing the base of the sled
|
|
|
|
|
|
|
01-27-2013, 12:35 PM
|
#111
|
|
Uncle Remus
Join Date: Mar 2003
Location: Lakeville Ma.
Posts: 14,773
|
excellent. well done. now get to turning.
Just a note when you do stuff like pine, ayc, port orford, red and white cedar, cherry you can fly thru the stuff. When you go onto maples, birch, locust and apple  , hardwoods you will need to really go slow with your stock removal. You will probably rip a few out from between the centers  . Cutting the edges off the pieces, making an octagon out of it will help immeasurably. I suggest that be your next creation. I like to use a band saw with a long 45 degree block others use table saw tilted at 45. I did a how to show my way several years ago but have no idea where it is now |
"A beach is a place where a man can feel he's the only soul in the world that's real"
|
|
|
|
|
01-27-2013, 01:12 PM
|
#112
|
|
Registered User
Join Date: Feb 2010
Location: CT
Posts: 448
|
Thanks for the tips Paul, I have that thread you mentioned bookmarked. I was thinking of making a similar jig for the tablesaw so I could use the same jig for different sized stock. For now I just rounded up some blanks with the roughing gouge before mounting the base to the lathe.
|
|
|
|
|
|
|
01-27-2013, 01:53 PM
|
#113
|
|
Oblivious // Grunt, Grunt Master
Join Date: Nov 2005
Location: over the hill
Posts: 6,682
|
I'm cursing my duplicator right now. I'm getting like Paul, I've got dozens of everything turned but nothing anywhere near finished.  |
|
|
|
|
|
|
01-27-2013, 01:54 PM
|
#114
|
|
Uncle Remus
Join Date: Mar 2003
Location: Lakeville Ma.
Posts: 14,773
|
that would work too. Just don't want to hear about you whacking your knuckles off and breaking some fingers trying to get the stock down to a round shape.
|
"A beach is a place where a man can feel he's the only soul in the world that's real"
|
|
|
|
|
01-27-2013, 01:57 PM
|
#115
|
|
Uncle Remus
Join Date: Mar 2003
Location: Lakeville Ma.
Posts: 14,773
|
lol that was the old Paul. The new Paul is even slower and has even more stuff half done. I think I need to start making a list of what I got so when I die my wife will know what to tell anyone who comes over to get that wooden crap out of the cellar was intended to be when finished. She may just call it kindling.
|
"A beach is a place where a man can feel he's the only soul in the world that's real"
|
|
|
|
|
01-27-2013, 04:25 PM
|
#116
|
|
Registered User
Join Date: Dec 2002
Location: North Branford,Ct.
Posts: 7,580
|
Ryan 560 enjoyed meeting you yesterday. Thats a sweet looking needle you have there.
|
Billy D.
|
|
|
|
|
01-27-2013, 05:37 PM
|
#117
|
|
Registered User
Join Date: Feb 2010
Location: CT
Posts: 448
|
Nice meeting you too Billy, Your club put on a great show I learned alot. Thanks for the compliment and the good deal on the redfins and plug lips.
|
|
|
|
|
|
|
01-28-2013, 06:40 AM
|
#118
|
|
Registered User
Join Date: Dec 2010
Posts: 134
|
Quote:
Originally Posted by Ryan560
One last picture, I made it so you can adjust the follower without removing the base of the sled
|
Nice work, looks great! |
|
|
|
|
|
|
01-28-2013, 01:54 PM
|
#119
|
|
Registered User
Join Date: Oct 2002
Posts: 3,594
|
Ross , them Mac's look nice !
Nice work
|
|
|
|
|
|
|
01-28-2013, 02:13 PM
|
#120
|
|
____________
Join Date: Jun 2008
Location: new bedford, Ma.
Posts: 651
|
Quote:
Originally Posted by Ryan560
I've been trying to finish up my dupe the last week or so, haven't turned anything new in a while. It's finished for the most part just have to add the handles. Thanks to everyone that helped me out, professor m and mojo7 and I borrowed some ideas from fishbumwannabe. The whole project cost me $5 and a few plugs.
|
I miss my homemade duplicator at times. Looking back now it was more work but much more enjoyable then a Vega. |
Nobody calls me Lebowski. You got the wrong guy. I'm the Dude, man.
|
|
|
|
|
|
 Posting Rules
|
You may not post new threads
You may not post replies
You may not post attachments
You may not edit your posts
HTML code is Off
|
|
|
All times are GMT -5. The time now is 04:53 AM.
|
| |


 Linear Mode
