| |
 |
|
|
|
 |
|
 |
| |
| Plug Building - Got Wood? Got Plug? |
 |
 04-25-2004, 08:16 PM
|
#1
|
|
Dave's Guide Service
Join Date: Jul 2001
Location: Cape Cod
Posts: 7,557
|
 Hey BassAssasin
How about showing Me how You Bend Your wire back into Your Poppers.
I bent Mine back in from the front and stress test then I epoxy'd it.
|
Pro Tool Club....
|

|

|
|
04-25-2004, 09:32 PM
|
#2
|
|
-------------
Join Date: Jan 2003
Location: Central Coastal NJ
Posts: 240
|
Not sure what you're referring to. The front wire is looped at the tie on and slid into a grommet. Then I make a loop at the other end and twist it closed in a vise. That is epoxied into the head, the rear is looped, slipped into the head and then slid into a grommet.Then I twist the rear of the plug like you would finish any other plug. Not sure exactly which part you are talking about though.
|
|
|
|
|
|
|
04-25-2004, 09:37 PM
|
#3
|
|
Dave's Guide Service
Join Date: Jul 2001
Location: Cape Cod
Posts: 7,557
|
So Your twisting the Tail on the front of the Lure 
loos like its looped and pushed into the rear of the front part
got pics? |
Pro Tool Club....
|
|
|
|
|
04-25-2004, 09:50 PM
|
#4
|
|
-------------
Join Date: Jan 2003
Location: Central Coastal NJ
Posts: 240
|
Quote:
Originally posted by bassmaster
So Your twisting the Tail on the front of the Lure
loos like its looped and pushed into the rear of the front part
got pics?
|
Dave,
I make the wire for the front first, make the front loop like you would for any other plug. Slide the grommet over the wire. Make a small loop in the other end and hold that in the vise, wrap the wire around itself like you are finishing a tail wrap on a normal plug. Then drill out your center hole on your head so it is slightly smaller than you're loop. Force the wire through the head. It will fit snug into the head but I epoxy it so there is no chance for the head to swivel on the wire. You must be very precise when you measure the length of the wire. too long and the space in the joint is too big, too small and you won't be able to get the wire for the rear piece through. They are a pain in the a$$ to make. I'll try to post some pics tomorrow. |
|
|
|
|
|
|
04-26-2004, 07:29 AM
|
#5
|
|
-------------
Join Date: Jan 2003
Location: Central Coastal NJ
Posts: 240
|
I assume you saw on the one I gave you that the front hole on the rear part of the plug is countersunk.
|
|
|
|
|
|
|
04-26-2004, 08:04 AM
|
#6
|
|
Registered User
Join Date: Jul 2002
Location: Maine
Posts: 4,547
|
Quote:
Originally posted by BassAssasin
Dave,
I make the wire for the front first, make the front loop like you would for any other plug. Slide the grommet over the wire. Make a small loop in the other end and hold that in the vise, wrap the wire around itself like you are finishing a tail wrap on a normal plug. Then drill out your center hole on your head so it is slightly smaller than you're loop. Force the wire through the head. It will fit snug into the head but I epoxy it so there is no chance for the head to swivel on the wire. You must be very precise when you measure the length of the wire. too long and the space in the joint is too big, too small and you won't be able to get the wire for the rear piece through. They are a pain in the a$$ to make. I'll try to post some pics tomorrow.
|
BA, do you use 2 grommets on the front wire? |
|
|
|
|
|
|
04-26-2004, 08:10 AM
|
#7
|
|
-------------
Join Date: Jan 2003
Location: Central Coastal NJ
Posts: 240
|
NG, can't do that the way I wire it. I will try to do a step by step at some point since it seems like a few guys are interested in making them. I will try to get pics up later today on how I wire the front.
|
|
|
|
|
|
|
04-26-2004, 12:26 PM
|
#8
|
|
Dave's Guide Service
Join Date: Jul 2001
Location: Cape Cod
Posts: 7,557
|
Quote:
Originally posted by BassAssasin
Dave,
I make the wire for the front first, make the front loop like you would for any other plug. Slide the grommet over the wire. Make a small loop in the other end and hold that in the vise, wrap the wire around itself like you are finishing a tail wrap on a normal plug. Then drill out your center hole on your head so it is slightly smaller than you're loop. Force the wire through the head. It will fit snug into the head but I epoxy it so there is no chance for the head to swivel on the wire. You must be very precise when you measure the length of the wire. too long and the space in the joint is too big, too small and you won't be able to get the wire for the rear piece through. They are a pain in the a$$ to make. I'll try to post some pics tomorrow.
|
THANK YOU!!!!!!!!!!!!!!!!!!!!!!!!!!!!!!!!!!!!!!!!!!!!!!! !!!!!!!!!!!!!!
AWSOME WAY OF DOING IT!!!!!!!!!!!!!!!!
THANKS AGAIN FOR THE GREAT TIP!!!!!!!!!!!!!!!!!!!!!!!!!!!!!!!!!! |
Pro Tool Club....
|
|
|
|
|
04-26-2004, 01:07 PM
|
#9
|
|
-------------
Join Date: Jan 2003
Location: Central Coastal NJ
Posts: 240
|
glad I could help  |
|
|
|
|
|
|
04-26-2004, 06:44 PM
|
#10
|
|
-------------
Join Date: Jan 2003
Location: Central Coastal NJ
Posts: 240
|
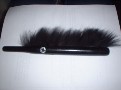
Dave here is a pic of the front wire. As stated previously, this piece is forced thru the head and then epoxied. I played with the weighting and different types of wood but I like no weight and alaskan yellow the best.
|
|
|
|
|
|
|
04-26-2004, 07:26 PM
|
#11
|
|
Registered User
Join Date: Jul 2002
Location: Maine
Posts: 4,547
|
Nice wire idea, I'll have to try that next time. I used a grommet on both ends and it was a beeeeeetch. Epoxy is drying now, will post pictures tomorrow. I put 1 slug behind the hook, don't know what that will do to it.
|
|
|
|
|
|
|
04-26-2004, 07:34 PM
|
#12
|
|
Dave's Guide Service
Join Date: Jul 2001
Location: Cape Cod
Posts: 7,557
|
Thanks Ba.
I will have to try that wire trick.
when I get time to turn I will make some with no weight
want to make a set fer me
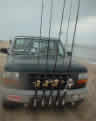
got My truck today and went in the Cave.
ended up cleaning up a needle row and wireing a few up.
Then I started stuffing a plug bag and going through the 100's of plugs filling it.
it is gear'd toward schoolies right now  |
Pro Tool Club....
|
|
|
|
|
04-26-2004, 07:36 PM
|
#13
|
|
-------------
Join Date: Jan 2003
Location: Central Coastal NJ
Posts: 240
|
Not sure I understand how you did that NG. A grommet in the rear hole on head? Sounds tough. I have weighted the chin and the tail as well as the tail only. Weighting the tail improves the casting but I like the way it works without any added weight. The ones I make are 2.25oz. and I cast pretty well.
|
|
|
|
|
|
|
04-26-2004, 07:39 PM
|
#14
|
|
-------------
Join Date: Jan 2003
Location: Central Coastal NJ
Posts: 240
|
Quote:
Originally posted by bassmaster
Thanks Ba.
I will have to try that wire trick.
when I get time to turn I will make some with no weight
want to make a set fer me
got My truck today and went in the Cave.
ended up cleaning up a needle row and wireing a few up.
Then I started stuffing a plug bag and going through the 100's of plugs filling it.
it is gear'd toward schoolies right now
|
Send me your needles POst pics of knuckleheads when you finish them, then send them to me  |
|
|
|
|
|
|
04-26-2004, 07:54 PM
|
#15
|
|
Registered User
Join Date: Jul 2002
Location: Maine
Posts: 4,547
|
Quote:
Originally posted by BassAssasin
Not sure I understand how you did that NG. A grommet in the rear hole on head? Sounds tough. I have weighted the chin and the tail as well as the tail only. Weighting the tail improves the casting but I like the way it works without any added weight. The ones I make are 2.25oz. and I cast pretty well.
|
I put a grommet in rear of the head. Pinched wire just enough to fit through grommet and installed wire. I then used a small screwdriver to work the loop open enough to get a wire to move freely through it. I then put some epoxy in to keep everything pointed in right direction. I like your idea better though as this way was difficult. |
|
|
|
|
|
|
04-26-2004, 08:13 PM
|
#16
|
|
Dave's Guide Service
Join Date: Jul 2001
Location: Cape Cod
Posts: 7,557
|
nice Head Newelly 
this is a cool thread....
hhhmmmmm no weight
BA how about one shot just in the tail?
I like Your idea
I have not swam Your plug Yet, its to perty.
I may just put a tad of weight in the tail.
not sure Yet.
Maybe I cast Yours and see how she flys.....
BTW, how I was going to do the rear bend was make a U about 1" long in the back and just slide it through and then dope it with epoxy..... |
Pro Tool Club....
|
|
|
|
|
04-26-2004, 09:19 PM
|
#17
|
|
Registered User
Join Date: Oct 2002
Location: Kentucky
Posts: 1,442
|
They swims nice Will throw some water when popping. Will wiggle a little if you V-wake them. Had to hide mine the other weekend, a couple of local ho's were looking at it with bad intensions  Definitely a cool way that you put these together.
Jigman |
|
|
|
|
|
|
04-27-2004, 06:20 AM
|
#18
|
|
-------------
Join Date: Jan 2003
Location: Central Coastal NJ
Posts: 240
|
Andrew, gotta watch those Kentucky Ho's
NG, that approach sounds difficult, but if it works and you're comfortable then go with it. That plug looks nice BTW 
Dave, weight the tail, you might like it better. My personal preference is no weight but I also made one with spruce with a shot in the chin and a shot in the tail so it would sit level. It works good and casts good but no better than the weightless ones IMO. Lets see more pics |
|
|
|
|
|
|
04-27-2004, 08:42 AM
|
#19
|
|
Registered User
Join Date: Dec 2003
Location: Yarmouth,Ma
Posts: 51
|
cool Ba , I will try unweighted ones .
But I do like a shot in the head no pun intended
just to have the plug staying put in the water....
If I get time Im going to try turn maybe 5 o9r 6 bodys and then go from there.
Im fixing to go mental on the bass here............. |
|
|
|
|
|
 Posting Rules
|
You may not post new threads
You may not post replies
You may not post attachments
You may not edit your posts
HTML code is Off
|
|
|
All times are GMT -5. The time now is 06:38 AM.
|
| |


 Linear Mode
