| |
 |
|
|
|
 |
|
 |
| |
| How To and Favorite Plug Forum Guides This location is for Plug Forum How-To and Step by Step guides as well as popular informational threads |
 |
 01-12-2003, 03:06 PM
|
#1
|
|
Registered User
Join Date: Oct 2001
Posts: 129
|
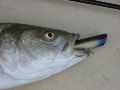
Shaping Bottle Plugs
I have assembled some pictures on how I shape my bottle lips, I have tried to make it as easy to understand as I could. I know a lot of guys don't use large bottles but the pictures and dimensions are for a 3 1/2 oz. bottle plug. I did this because the larger size makes it easier to work with when you first start out. Once you make one to your liking it is easy to scale everything down a little bit and make smaller ones. The plug is 7 5/16" long. The head at the top is 1 3/8" dia. measuring down from the top of the plug 1" it is 1 3/16" dia. Measuring down from the top of the plug 1 13/16" is the center of the neck at 11/16'' dia. The taper of the head is probably the most important part to get the lip to form nicely.
Last edited by Slipknot; 01-29-2011 at 08:47 PM..
|
|
|

|

|
|
01-12-2003, 03:07 PM
|
#2
|
|
Registered User
Join Date: Oct 2001
Posts: 129
|
These are the measurement that are laid out on the first one. You only have to do this once, further down in the pictures is a very quick way to trace that shape onto the rest of the plugs. For clarification the left and right sides are determined from looking down on the plug from the top. On the left and right sides I have measured down 1 1/8" and the put a mark 1/4" at that level towards the top of the plug. In the bottom view I have measured across the centerline at the top 7/16" each way to get the 7/8". Also in the bottom view the two measurements going down the plug are the chin weight and belly hook respectively.
Last edited by Slipknot; 01-29-2011 at 08:51 PM..
|
|
|
|
|
|
|
01-12-2003, 03:08 PM
|
#3
|
|
Registered User
Join Date: Oct 2001
Posts: 129
|
Now all you have to do is connect the dots. One thing that is important is the deepest part of the lip is closer to the top than to the centerline. That's where the 1/4" mark towards the top comes in, that's the deepest point. I neglected to scribe this in but you can put a pencil mark on the centerline at 1 1/16" on the two sides as that is where your tracing should intersect the centerline.
Last edited by Slipknot; 01-29-2011 at 08:52 PM..
|
|
|
|
|
|
|
01-12-2003, 03:09 PM
|
#4
|
|
Registered User
Join Date: Oct 2001
Posts: 129
|
This is how I shape out the lip using a 1" drum sander in my drill press. I go back and forth from one side to the other to try and get it to come evenly. In the second picture the first view is where I cut the top on the bandsaw to remove a good chunk of stock and save some time. Make sure you stay at least 1/4" away from the line or you will get a saw kerf that is deeper than you are going to sand. The next three views in the second picture show various stages of what it should look like while you are sanding up to the lines. On the first plug the drum sander make take it's own slightly different shape than the line you freehanded, that's ok. It's more important to try and not go past the depth marks on the top and sides.
Last edited by Slipknot; 01-29-2011 at 08:53 PM..
|
|
|
|
|
|
|
01-12-2003, 03:10 PM
|
#5
|
|
Registered User
Join Date: Oct 2001
Posts: 129
|
second picture
Last edited by Slipknot; 01-29-2011 at 08:56 PM..
|
|
|
|
|
|
|
01-12-2003, 03:11 PM
|
#6
|
|
Registered User
Join Date: Oct 2001
Posts: 129
|
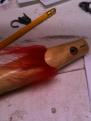
Once I sand down to the line I take a rubber sanding block with a piece of 80 grit paper and smooth out the taper on the front of the lip which still looks a little ragged after the drum sander. You have to go easy with the hand sanding across the front of the lip, I've knocked off chunks of the edge before because you're sanding against the grain. I put a bevel on the front and finish with a little 220 grit paper with my finger inside the contours to smooth it out.
Last edited by Slipknot; 01-29-2011 at 08:57 PM..
|
|
|
|
|
|
|
01-12-2003, 03:12 PM
|
#7
|
|
Registered User
Join Date: Oct 2001
Posts: 129
|
One of the hardest things to keep from doing is undercutting the face of the plug where the wire goes. I try to lay off the pressure when I get to the center of the plug while I'm using the drum sander. If you look at the space under the line in the first view, there is maybe a little more than 1/16". The second view has got too much space under the line, the sides don't slope enough to get a good wiggle. The third view is how I keep looking at the plug to make sure the sides are even. It's better to go past your marks on one side or the other to even off the edges. It makes for a straighter swimming plug.
Last edited by Slipknot; 01-29-2011 at 08:58 PM..
|
|
|
|
|
|
|
01-12-2003, 03:13 PM
|
#8
|
|
Registered User
Join Date: Oct 2001
Posts: 129
|
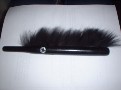
Once you have a shape you are happy with and swims well, this is an easy way to preserve that shape. Wrap a piece of 1 1/2" masking tape around the plug,overlapping in the back.use an exacto knife or a single edged razor blade and carefully cut along the edge of the lip. Peel off the tape and transfer it to a piece of hard plastic that you can cut easily, I use bondo spreaders. Trace and cut out the shape in the plastic, now you can lay 2 or 3 pieces of tape over the plastic and cut out the exact shape very quickly. Usually after 4 or 5 tracings the stickiness has left the tape and I'll grab a new piece depending on how may I'm tracing.
Last edited by Slipknot; 01-29-2011 at 08:59 PM..
|
|
|
|
|
|
|
01-12-2003, 03:14 PM
|
#9
|
|
Registered User
Join Date: Oct 2001
Posts: 129
|
Once i cut a piece of tape I put a little center mark in the middle and use that to line up the tape on the top side of the plug. I use 5 marks, the one on top at 13/16", the two on the sides at 1 1/16" where the line intersects the center line and the two on the back at 7/8". Follow the marks with the tape and trace it out.
Last edited by Slipknot; 01-29-2011 at 09:00 PM..
|
|
|
|
|
|
|
01-12-2003, 03:14 PM
|
#10
|
|
Registered User
Join Date: Oct 2001
Posts: 129
|
This is the weighting pic. One small piece under the chin it wieghs 4 grams,I'm not sure in ounces.This helps it to roll over right away and to start digging. The back piece is 5/16" thick and 1 3/4" long., it weighs 16 grams which is a little over 1/2 oz. With hooks and finish the plug weighs 94.8 grams which is 3.4 oz. ...mrpogie
Last edited by Slipknot; 01-29-2011 at 09:00 PM..
|
|
|
|
|
|
|
01-12-2003, 04:06 PM
|
#11
|
|
Registered User
Join Date: Jul 2002
Location: Indianapolis, IN
Posts: 1,269
|
Great post Mr Pogie, you have made my plug building life a whole lot easier 
Thanks,
Bernzy |
"Sometimes you eat the bear and, well, sometimes... the bear, he eats you." _____________________
Support your S-B sponsors
--------------------------------------
|
|
|
|
|
01-12-2003, 04:43 PM
|
#12
|
|
Super Moderator
Join Date: Aug 2000
Location: Middleboro MA
Posts: 17,119
|
Thanks mrpogie , that detailed tutorial is much appreciated.
|
|
|
|
|
|
|
01-12-2003, 05:25 PM
|
#13
|
|
Registered User
Join Date: Oct 2001
Location: .
Posts: 5,935
|
I was watching you do that at the recent plug-building get-together. Was kicking myself afterwards for not taking notes.
Now I don't feel so bad! Thanks...this is going into a hardcopy binder.
-WW
|
|
|
|
|
|
|
01-12-2003, 09:14 PM
|
#14
|
|
viva the plug-o-lution
Join Date: May 2002
Location: notsob
Posts: 3,476
|
thanks, ive been meaning to ask how to make those right. need more wood now.
|
live to fish. fish to live. rod tips high.
|
|
|
|
|
01-18-2003, 11:11 PM
|
#15
|
|
Dave's Guide Service
Join Date: Jul 2001
Location: Cape Cod
Posts: 7,557
|
I musta rread this post a jillion times.
Slip can You save this???
|
Pro Tool Club....
|
|
|
|
|
01-19-2003, 11:15 AM
|
#16
|
|
Registered User
Join Date: Jan 2003
Location: jerseyshore
Posts: 4,949
|
made some bottles last wintr with my buddy tony from lex. he had a jig made up in fifteen minutes(woodworkin genius)that made perfect copie.Made the bodies with the duplicatr drill the holes anchor the body with the swivel hole come up with the right angle to approach the drum sander perfect clones every one.theres some more to it(lots of clamping an such) but u can try to figure it out from there. Mr. pogies way will work but I don't think thats how Gibbs or any other mass proucers do it.Also please donot take this as a nck on Mr. pogie's work I think he is the best. an his displays are second to none. please keep it up.Alot of his tricks have been comon knowledge among the better plug builders in my neck of the woods.I think he is a spy  |
|
|
|
|
|
|
01-19-2003, 12:41 PM
|
#17
|
|
Registered User
Join Date: Jun 2002
Location: Warren Vt
Posts: 668
|
NIB, having done woodwork for a living the past 20 years, i don't think that there are that many unknown tricks out there. i am sure if MR. Porgie was aiming at professional plug builders his great articlle would have been differant. as far as LEX lures go the only one that i have the lipless swimmer,would not have left my shop for sale, the slope on the head is not even close to even.by the way i only own one other mass produced plug, that is a gibbs,the end of the tail didn' even have paint on it. but thats what happens in the massed produced market you get what you pay for
|
|
|
|
|
|
|
01-19-2003, 05:01 PM
|
#18
|
|
Registered User
Join Date: Oct 2001
Posts: 129
|
There's no question that making up some jigs would help produce numbers of exact copies quickly. I know about some of the jigs and have a couple of my own design. I've seen the gibbs video at the Mass Bass show and they have a special jig setup with a drum sander. This article was aimed at guys who want to make a few of their own and don't want to get involved in spending a lot of time of experimenting with making jigs. I tried to show a way that it could be done with basic tools that most guys have. ...mrpogie
Last edited by mrpogie; 01-19-2003 at 05:09 PM..
|
|
|
|
|
|
|
01-19-2003, 05:06 PM
|
#19
|
|
Registered User
Join Date: Jan 2003
Location: jerseyshore
Posts: 4,949
|
cool
|
|
|
|
|
|
|
01-19-2003, 05:13 PM
|
#20
|
|
Registered User
Join Date: Jun 2002
Location: Warren Vt
Posts: 668
|
Nib, never said that gibbs or lex makes lousy plugs. and as far as jigs go if they are not made right you have a large quanity of ruined products. i am glad to hear your friend Tony has made money with the plug business,you have got to very effiecient to mass produce small items for a profit. and let me say this the most accurate tool in your shop is your eye.
|
|
|
|
|
|
|
01-02-2005, 05:05 PM
|
#21
|
|
Super Moderator
Join Date: Aug 2000
Location: Middleboro MA
Posts: 17,119
|
hey John, any chance the pics in this thread can be fixed and returned to what they once were? I think when you changed servers last year, all the existing pictures got replaced by all new pictures posted and were given those names or something like that 

I'd like to put these threads in the popular how to forum up there but it makes no sense without the pictures.
 thanks |
|
|
|
|
|
|
01-02-2005, 06:08 PM
|
#22
|
|
Registered User
Join Date: Jan 2003
Location: Hard aground
Posts: 1,362
|
This was a great tutorial...
|
|
|
|
|
|
|
01-03-2005, 08:49 PM
|
#23
|
|
Registered User
Join Date: Jan 2003
Location: jerseyshore
Posts: 4,949
|
I can't belive i said that.Ha ha haha ahahahahahaha .
|
|
|
|
|
|
|
02-14-2005, 09:58 PM
|
#24
|
|
D'oh
Join Date: May 2004
Location: RI
Posts: 3,296
|
any chance for the pics?
|
i bent my wookie
|
|
|
|
|
01-29-2011, 01:51 AM
|
#25
|
|
Registered User
Join Date: Mar 2004
Location: whaling city
Posts: 302
|
How about a fix on the pics
Bump
|
|
|
|
|
|
|
01-29-2011, 09:02 PM
|
#26
|
|
Super Moderator
Join Date: Aug 2000
Location: Middleboro MA
Posts: 17,119
|
All fixed now
 |
|
|
|
|
|
|
01-29-2011, 10:06 PM
|
#27
|
|
Registered User
Join Date: Mar 2004
Location: whaling city
Posts: 302
|
Thanks Slip
|
|
|
|
|
|
|
02-13-2011, 08:11 PM
|
#28
|
|
Registered User
Join Date: Jan 2010
Location: S. Easton
Posts: 1,676
|
Thanks bruce! Need to buy some more tools....
|
|
|
|
|
|
|
 Posting Rules
|
You may not post new threads
You may not post replies
You may not post attachments
You may not edit your posts
HTML code is Off
|
|
|
All times are GMT -5. The time now is 02:34 AM.
|
| |


 Linear Mode
